Installing septic tank risers provides crucial, easy ground-level access for essential pumping and inspection, eliminating the need for messy, costly digging. DIY installations typically range from $100-$300 per riser, while professional services cost $300-$800+. This simple upgrade is a game-changer for preventing septic emergencies and simplifying routine maintenance.
- Key Benefit 1: Eliminates digging, saving time and your landscaping.
- Key Benefit 2: Cost-effective upgrade: DIY $100-$300/riser; Pro $300-$800+/riser.
- Key Benefit 3: Simplifies maintenance, helping prevent costly system failure.
Table of Contents
Imagine the dread: it’s time to pump your septic tank, and once again, you’re faced with the grueling task of locating and digging up a buried, heavy concrete lid. Your pristine lawn gets torn up, your back aches, and precious hours are lost. This frustrating scenario is a common pain point for countless homeowners with traditional septic systems. But what if there was a simple, one-time upgrade that could eliminate this hassle forever, saving you time, money, and your landscaping?
Enter the septic tank riser. This ingenious solution extends your septic tank’s access ports from the buried lid to ground level, making inspections, pumping, and maintenance as easy as lifting a lightweight, secure cover. In this ultimate guide, we’ll demystify septic tank riser installation, covering everything from understanding different types and costs to a detailed, DIY-friendly installation walkthrough. We’ll also highlight crucial safety warnings and equip you with the knowledge to decide if a DIY approach or professional installation is right for you. Get ready to transform your septic maintenance from a chore into a simple task!
Why is Septic Tank Riser Installation So Important for Homeowners?
A: Septic tank riser installation is vital because it transforms a buried, difficult-to-access septic tank into a system with convenient ground-level access. This eliminates the significant labor, cost, and landscape damage associated with digging up heavy, buried lids for routine pumping and inspections. Essentially, risers make essential septic maintenance far more efficient, less disruptive, and safer.
For decades, burying septic tank lids out of sight was standard practice. While aesthetically pleasing, it created a major headache for homeowners and septic professionals alike. Every 3-5 years (or more frequently, depending on household size and water usage), your tank needs pumping to prevent sludge buildup and potential drain field failure. Without risers, this essential maintenance means:
- Costly Digging Fees: Many septic pumpers charge extra for locating and excavating buried lids, often $50-$150 per visit, adding up significantly over the system’s lifespan.
- Landscape Damage: Each pumping visit means disturbing your lawn, shrubs, or garden beds, leaving unsightly patches and potential erosion.
- Time and Effort: If you’re a DIY enthusiast, you know the back-breaking labor involved in digging through compacted soil and lifting heavy concrete lids (which can weigh over 100 pounds!).
- Emergency Delays: In a septic emergency (like a backup), precious time is lost searching for and digging up the tank, delaying critical repairs and potentially increasing damage.
- Safety Hazards: Buried lids can become structurally compromised over time, posing a collapse risk if heavy equipment or people unknowingly pass over them. Toxic gases can also accumulate in the tank, making direct access dangerous without proper ventilation.
Septic tank riser installation solves all these problems. By bringing the access point to grade, you gain:
- Effortless Access: Pumping and inspections become quick, clean procedures.
- Preserved Landscaping: Your yard remains undisturbed.
- Reduced Costs: Eliminate digging fees and potential emergency surcharges.
- Enhanced Safety: Clearly marked, secure risers prevent accidental fall-ins and alert you to the presence of a septic tank.
- Increased Property Value: A well-maintained and easily accessible septic system is a selling point for potential buyers.
⚠️ CRITICAL SAFETY WARNING: Never attempt to open a septic tank or enter its contents without proper training and equipment. Septic tanks contain highly toxic and flammable gases like methane and hydrogen sulfide, which can cause unconsciousness or death in minutes. According to the EPA, working with septic systems requires extreme caution. Always ensure adequate ventilation and have a second person present when removing lids.
Understanding Your Septic System’s Access Points
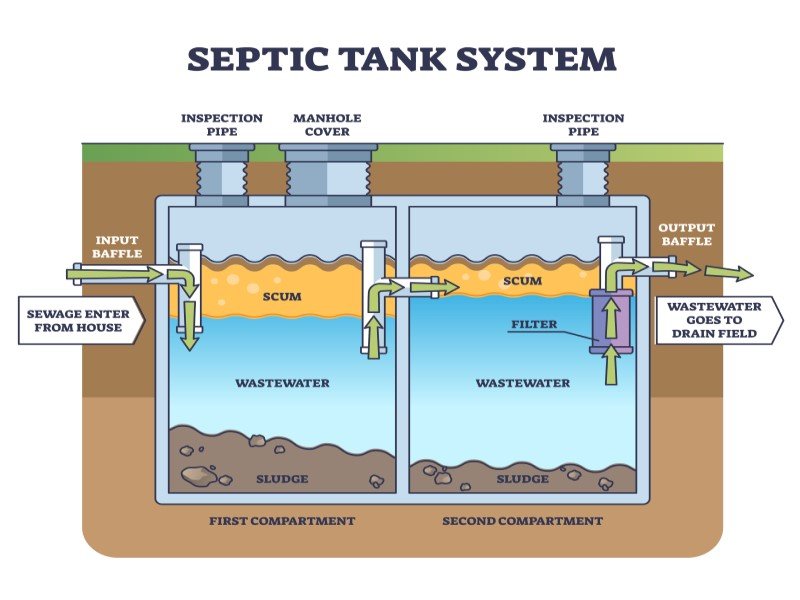
Before installing risers, it helps to understand your septic tank’s anatomy. Most conventional septic tanks have two main access points:
- Inlet (Scum) Opening: Where wastewater enters from your home, forming the scum layer.
- Outlet (Effluent) Opening: Where clarified wastewater (effluent) exits the tank to the drain field.
Both of these points often have lids, with the outlet side typically being the primary access for pumping. Some tanks may also have a central manhole access. Traditional tanks usually have concrete lids buried 6 inches to several feet below grade. Risers effectively become extensions of these openings, allowing the lid to sit at or just above ground level.
Septic Tank Riser Types: Choosing the Right Material for Durability
Septic risers come in various materials, each with pros and cons:
- Polyethylene/Plastic Risers:
- Pros: Lightweight, easy to install, resistant to corrosion, readily available, often stackable, come with integrated lids. They offer excellent resistance to chemicals commonly found in wastewater.
- Cons: Can be more expensive than concrete, requires proper sealing to prevent groundwater infiltration. Some UV exposure over many years might lead to brittleness.
- Best for: Most DIY installations, existing concrete or plastic tanks, areas prone to corrosion.
- Concrete Risers:
- Pros: Very durable, matches existing concrete tanks, can be more cost-effective for large diameters. They are heavy and robust.
- Cons: Extremely heavy, requires heavy lifting equipment or multiple people, prone to cracking if not handled carefully, sealing can be more challenging, susceptible to acid corrosion from wastewater over time.
- Best for: New septic system installations, professional installations with heavy equipment, when matching existing concrete structures is paramount.
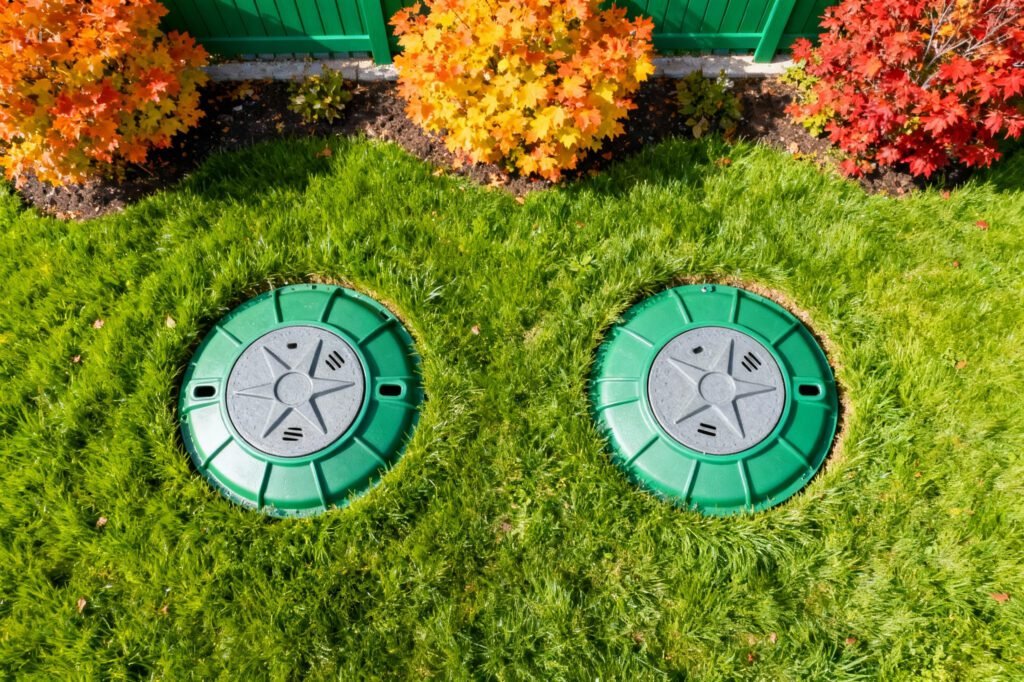
Riser Lids: These are crucial for safety and aesthetics. Most risers come with secure, often green, dome-shaped lids that blend into the landscape. Some are flat, and many include child-resistant locks or bolts to prevent accidental access. Choosing a lid with a good seal is paramount to preventing groundwater contamination.
Diameter & Height: Risers are typically 12, 18, 20, or 24 inches in diameter to match standard tank openings. They are available in various heights (e.g., 6, 12, or 24 inches) and are designed to stack, allowing you to reach any desired grade level.
Septic Riser Cost: What You Should Expect to Pay in 2026
The cost of septic tank riser installation varies significantly based on whether you DIY or hire a professional, the number of risers, tank depth, and material.
DIY Septic Riser Cost Breakdown:
| Item | Estimated Cost Per Riser (USD) | Notes |
|---|---|---|
| Plastic Riser Section (12-24″) | $50 – $120 | You may need multiple sections depending on depth. |
| Riser Lid (Green Dome, Lockable) | $30 – $80 | Often sold separately or with base kits. |
| Butyl Mastic Sealant/Adhesive | $10 – $30 | Essential for a watertight seal between concrete and plastic. |
| Concrete Anchors/Screws (if needed) | $5 – $15 | For securing the base riser to a concrete tank. |
| Tools (Shovel, pry bar, level, caulk gun) | $0 – $100+ | If you don’t already own them; can be rented. |
| TOTAL DIY COST | $95 – $345+ per riser | Varies greatly by the number of sections and required tools. |
Professional Septic Riser Installation Cost:
Hiring a licensed septic contractor ensures correct installation and proper sealing, especially important in areas with strict environmental regulations.
- Labor: $200 – $500+ per riser
- Materials: (Risers, lids, sealant) Typically marked up from retail cost.
- Excavation: Included in labor, or may be an additional fee for very deep tanks.
- TOTAL PROFESSIONAL COST: $300 – $800+ per riser
Key Factors Influencing Cost:
- Tank Depth: Deeper tanks require more riser sections, increasing material and labor costs.
- Number of Risers: Most tanks need two risers (inlet and outlet).
- Tank Material: Installing on old, uneven concrete tanks can be more complex.
- Location: Labor costs vary by region and local demand.
- Permit Fees: Some municipalities require permits for septic system modifications.
Definition Box: A “Baffle” in a septic tank is a T-shaped pipe or wall that directs incoming wastewater downward to prevent disturbing the scum layer, and outgoing effluent from drawing solids into the drain field. Risers should align with these baffles for proper tank function and inspection access.
Is DIY Septic Tank Riser Installation Safe for Homeowners?
A: DIY septic tank riser installation can be safe if you have the necessary skills, tools, and a shallow tank. However, it carries significant risks, especially with deep tanks, unstable existing lids, or if you are uncomfortable with excavation and the potential for toxic gases. For most homeowners, especially those in the [Your Region/State] area, hiring a licensed professional is the safer and more reliable option.
While septic riser installation can be a rewarding DIY project, it’s not without serious risks. Your safety is paramount.
When NOT to DIY:
- Deep Tanks (over 3-4 feet to lid): Excavation becomes more hazardous due to collapsing trench walls. Heavy equipment might be needed.
- Compromised Tank Structure: If your existing concrete lid or tank opening is cracked, spalling, or appears unstable, do NOT proceed. You risk further damage or collapse.
- Uncertain Tank Location or Material: If you can’t confidently locate your tank or determine its material, call a pro.
- Lack of Proper Tools or Assistance: Lifting heavy soil, old concrete lids, and new risers requires strength and sometimes specialized tools. Never attempt alone.
- Hesitation Regarding Toxic Gases: If you’re uncomfortable with the extreme danger of septic gases, leave it to the professionals.
When DIY IS Appropriate:
- Shallow Tanks (1-3 feet to lid): Easier, safer excavation.
- Clear Tank Access: When the existing lid is relatively easy to expose and remove.
- Basic Handyman Skills: You should be comfortable with excavation, measuring, and applying sealants.
- Proper Safety Gear: You must have sturdy gloves, safety glasses, and a plan for adequate ventilation.
- Assistance: Always have a helper present who can call for help if needed.
DANGER: Never enter a septic tank! The lack of oxygen and presence of toxic gases like hydrogen sulfide can cause immediate unconsciousness and death. Always work from outside the tank and ensure clear escape routes. According to the CDC, confined space entry dangers are severe.
How Do I Choose the Right Septic Tank Risers and Lids?
A: Choosing the right septic tank risers involves considering material, diameter, and height. Plastic (polyethylene) risers are common for DIY due to their light weight and corrosion resistance, while concrete is durable but heavy. Ensure the riser diameter matches your tank’s opening (typically 18-24 inches) and select enough height sections to bring the access point safely to or just above ground level. Lids must be secure, watertight, and ideally child-resistant.
Septic Tank Riser Types: Choosing the Right Material for Durability
Septic risers come in various materials, each with pros and cons:
- Polyethylene/Plastic Risers:
- Pros: Lightweight, easy to install, resistant to corrosion, readily available, often stackable, come with integrated lids. They offer excellent resistance to chemicals commonly found in wastewater.
- Cons: Can be more expensive than concrete, requires proper sealing to prevent groundwater infiltration. Some UV exposure over many years might lead to brittleness.
- Best for: Most DIY installations, existing concrete or plastic tanks, areas prone to corrosion.
- Concrete Risers:
- Pros: Very durable, matches existing concrete tanks, can be more cost-effective for large diameters. They are heavy and robust.
- Cons: Extremely heavy, requires heavy lifting equipment or multiple people, prone to cracking if not handled carefully, sealing can be more challenging, susceptible to acid corrosion from wastewater over time.
- Best for: New septic system installations, professional installations with heavy equipment, when matching existing concrete structures is paramount.
Riser Lids: These are crucial for safety and aesthetics. Most risers come with secure, often green, dome-shaped lids that blend into the landscape. Some are flat, and many include child-resistant locks or bolts to prevent accidental access. Choosing a lid with a good seal is paramount to preventing groundwater contamination.
Diameter & Height: Risers are typically 12, 18, 20, or 24 inches in diameter to match standard tank openings. They are available in various heights (e.g., 6, 12, or 24 inches) and are designed to stack, allowing you to reach any desired grade level.
Septic Riser Cost: What You Should Expect to Pay in 2026
The cost of septic tank riser installation varies significantly based on whether you DIY or hire a professional, the number of risers, tank depth, and material.
DIY Septic Riser Cost Breakdown:
| Item | Estimated Cost Per Riser (USD) | Notes |
|---|---|---|
| Plastic Riser Section (12-24″) | $50 – $120 | You may need multiple sections depending on depth. |
| Riser Lid (Green Dome, Lockable) | $30 – $80 | Often sold separately or with base kits. |
| Butyl Mastic Sealant/Adhesive | $10 – $30 | Essential for a watertight seal between concrete and plastic. |
| Concrete Anchors/Screws (if needed) | $5 – $15 | For securing the base riser to a concrete tank. |
| Tools (Shovel, pry bar, level, caulk gun) | $0 – $100+ | If you don’t already own them; can be rented. |
| TOTAL DIY COST | $95 – $345+ per riser | Varies greatly by the number of sections and required tools. |
Professional Septic Riser Installation Cost:
Hiring a licensed septic contractor ensures correct installation and proper sealing, especially important in areas with strict environmental regulations.
- Labor: $200 – $500+ per riser
- Materials: (Risers, lids, sealant) Typically marked up from retail cost.
- Excavation: Included in labor, or may be an additional fee for very deep tanks.
- TOTAL PROFESSIONAL COST: $300 – $800+ per riser
Key Factors Influencing Cost:
- Tank Depth: Deeper tanks require more riser sections, increasing material and labor costs.
- Number of Risers: Most tanks need two risers (inlet and outlet).
- Tank Material: Installing on old, uneven concrete tanks can be more complex.
- Location: Labor costs vary by region and local demand.
- Permit Fees: Some municipalities require permits for septic system modifications.
Definition Box: A “Baffle” in a septic tank is a T-shaped pipe or wall that directs incoming wastewater downward to prevent disturbing the scum layer, and outgoing effluent from drawing solids into the drain field. Risers should align with these baffles for proper tank function and inspection access.
What are the key steps for installing a septic tank riser myself?
A: The key steps for installing a septic tank riser involve:
- Locating and Excavating: Safely find your tank lids and dig around them to expose the opening.
- Cleaning the Opening: Thoroughly clean the tank’s rim for a good seal.
- Fitting and Sealing: Dry-fit riser sections to determine height, apply sealant, and attach the base riser.
- Securing (if needed): Fasten plastic risers to concrete tanks with anchors.
- Stacking and Sealing: Add additional riser sections and seal them together.
- Lid Installation: Secure the final riser lid.
- Backfilling: Carefully refill the excavated area.
Step-by-Step DIY Septic Tank Riser Installation Guide
This guide focuses on installing plastic risers onto a concrete septic tank opening, the most common DIY scenario.
Tools & Materials Checklist:
- Safety Gear: Heavy-duty gloves, safety glasses, respirator (optional but recommended for strong odors).
- Excavation: Shovel, digging bar or pickaxe (for compacted soil), pry bar (for old lid).
- Measuring & Leveling: Tape measure, level.
- Cleaning: Wire brush, rag.
- Risers: Plastic riser sections and matching lid(s) (e.g., Infiltrator IM-Series or Tuf-Tite).
- Sealant: Butyl mastic rope sealant (recommended for concrete to plastic), or hydraulic cement for concrete-to-concrete applications.
- Fasteners: Concrete anchors/screws and a masonry drill bit (for securing plastic risers to concrete).
- Optional: Small sledgehammer or chisel (for uneven concrete).
Pre-Installation Checklist:
- Locate Your Tank Lids: Check property records, septic system diagrams, or use a metal probe (like a rebar) to carefully locate the edges of your tank and its access lids.
- Confirm Tank Material: Most older tanks are concrete. Fiberglass or plastic tanks require different sealing methods (check manufacturer instructions for your specific tank).
- Measure Depth: Dig a small test hole to determine the depth from the ground surface to the top of your existing septic lid. This tells you how many riser sections you’ll need.
- Mark Area: Clearly mark the area around each lid where you’ll excavate.
- Call Before You Dig: Always call 811 (in the US) or your local utility notification center a few days before you dig to prevent hitting buried utility lines.
Installation Steps:
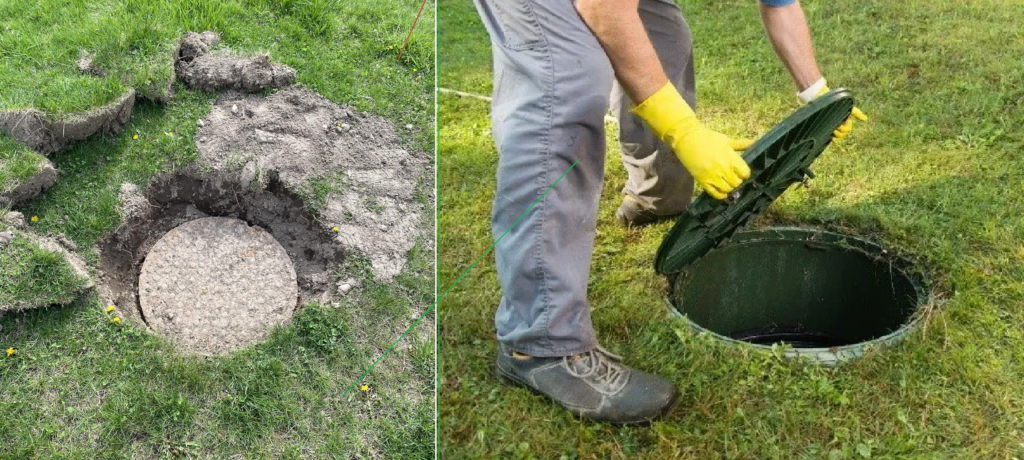
Step 1: Excavate Around the Lid(s)
- Carefully dig around the perimeter of the existing septic tank lid. Aim for an excavation wider than your riser diameter (e.g., 30-36 inches) to give you room to work.
- Dig down until the entire top surface of the concrete tank and the lid(s) are exposed.
Step 2: Expose and Remove the Old Lid(s)
- Once exposed, clean off any dirt or debris from the lid and the tank opening.
- Use a pry bar or strong leverage to gently remove the old concrete lid(s). Be extremely cautious; these are heavy. Set them aside safely.
Step 3: Clean the Tank Opening
- Thoroughly clean the exposed concrete lip of the tank opening where the riser will sit. Use a wire brush to remove any dirt, old sealant, or debris. The surface must be clean and dry for the new sealant to adhere properly.
- Inspect the concrete opening for cracks or unevenness. If very uneven, you might need to chisel it down or use hydraulic cement to create a level surface.
Step 4: Dry Fit Riser Sections
- Place the base riser section onto the cleaned tank opening.
- Stack additional riser sections on top until the desired height is reached (just above ground level). Ensure they are level. This helps you confirm the correct number of sections.
Step 5: Secure the Base Riser & Seal
- Apply a generous bead of butyl mastic rope sealant around the entire perimeter of the tank’s opening. Press it down firmly.
- Carefully place the first riser section onto the sealant, ensuring it’s centered and level.
- For concrete tanks, it’s highly recommended to secure the plastic riser to the concrete tank using masonry screws and appropriate anchors (e.g., Tapcon screws). Drill pilot holes through the riser flange and into the concrete (at least 4-6 evenly spaced holes). This prevents the riser from shifting.
Step 6: Stack & Seal Additional Sections (If Needed)
- If your tank is deep, you’ll need multiple riser sections. Apply sealant to the top edge of the installed riser section.
- Carefully place the next riser section on top, aligning it. Press down firmly to create a good seal. Repeat for all necessary sections. Ensure each section is level as you go.
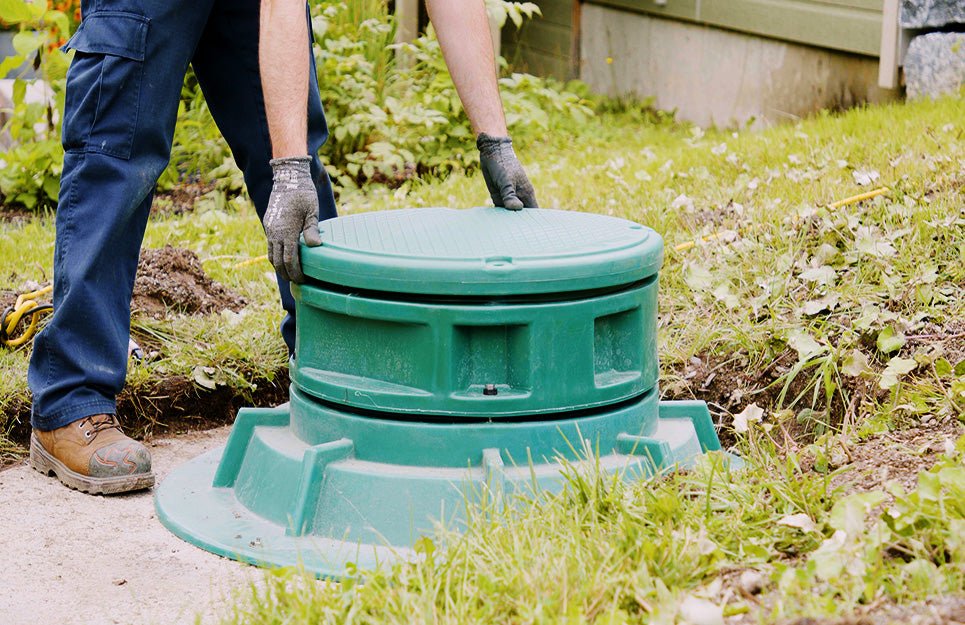
Step 7: Install the Riser Lid
- Once all riser sections are installed and sealed, apply a final bead of sealant to the top rim of the uppermost riser.
- Place the riser lid securely on top. Most lids come with screws or latches that fasten to the riser to prevent accidental removal and ensure child safety. Install these fasteners.
Step 8: Backfill and Landscape
- Carefully backfill the excavated area around the risers with soil, compacting it gently as you go to prevent settling.
- Landscape around the risers. The green lids are designed to blend discreetly into most lawns.
Recommended Septic Riser Kits & Accessories
To make your DIY septic tank riser installation a breeze, consider these top-rated products and essential accessories:
Top Riser Brands:
- Infiltrator Water Technologies IM-Series Risers: (Plastic) Known for their durability and ease of installation. These stackable risers come in various heights and diameters, often with integrated lids. They are a trusted choice by many septic professionals.
- Price Range: $60-$150 per section, $40-$80 for lids.
- Availability: Home Depot, Lowe’s, Amazon, local septic supply stores.
- [Shop Infiltrator IM-Series Risers on Amazon] (Affiliate Link)
- Tuf-Tite Risers: (Plastic) Another highly-regarded brand, offering strong, lightweight, and stackable riser sections with secure, green lids. They provide excellent sealing capabilities.
- Price Range: $55-$130 per section, $35-$75 for lids.
- Availability: Home Depot, Lowe’s, Amazon, septic supply distributors.
- [Explore Tuf-Tite Septic Risers at Home Depot] (Affiliate Link)
Essential Accessories:
- Butyl Mastic Rope Sealant: Essential for creating a watertight, gas-tight seal between your concrete tank and plastic risers. It remains flexible and adheres well.
- Price Range: $10-$25 per roll.
- Availability: Amazon, hardware stores.
- [Buy Butyl Mastic Sealant on Amazon] (Affiliate Link)
- Septic Tank Locator Tool: If you’re struggling to find your buried lids, a metal probe or a specialized locator can save hours of digging. This is a crucial first step.
- Price Range: $30-$100+.
- Availability: Amazon, Tractor Supply Co.
- [Find Septic Tank Locator Tools on Amazon] (Affiliate Link)
- Concrete Anchors & Masonry Drill Bit: If you have a concrete tank, securing the base riser with anchors is highly recommended for stability.
- Price Range: $10-$25.
- Availability: Hardware stores.
What are some essential septic system maintenance tips once risers are installed?
A: Once risers are installed, essential septic system maintenance includes:
- Regular Pumping: Continue pumping every 3-5 years (or as recommended by your system’s usage).
- Annual Inspections: Visually check risers for damage, leaks, or settling.
- Water Conservation: Reduce overall water usage to ease system load.
- Proper Waste Disposal: Avoid flushing non-biodegradable items or chemicals.
- Protecting the Drain Field: Never drive or park over your drain field or risers.
Essential Septic Maintenance Tips with Your New Risers
With your risers installed, septic maintenance just got a whole lot easier. Remember these key practices:
- Regular Pumping: Even with easy access, pumping every 3-5 years (or more frequently if you have a garbage disposal or larger household) is non-negotiable. [Link to: Septic Tank Pumping Guide: Costs, Frequency & Warning Signs]
- Annual Inspections: A quick visual check of your risers and the area around them can catch issues early. Look for cracks, signs of settling, or odors. This is an excellent opportunity to ensure lids are secure.
- Water Conservation: Reduce strain on your system by using water efficiently. Doing so helps prevent overloading the tank and drain field.
- Proper Waste Disposal: Avoid flushing non-biodegradable items, grease, or harsh chemicals down your drains. These can disrupt the beneficial bacteria in your tank and clog the system. [Link to: What NOT to Flush Down Your Septic System]
- Protect Your Drain Field: Never drive or park vehicles over your drain field or risers. The weight can crush pipes and compact soil, leading to premature failure.
- Landscaping: Keep trees and shrubs with invasive roots away from your tank and drain field. Their roots can infiltrate and damage the system.
What if my septic tank opening isn’t perfectly round?
A: If your septic tank opening is not perfectly round, you may need an adapter plate. These plates, often made of fiberglass or plastic, seal to your existing opening and provide a standard round surface for the riser to attach. This is a common solution for older or non-standard septic tanks.
Frequently Asked Questions (People Also Ask Section)
Q: How many risers do I need for my septic tank?
A: Most conventional septic tanks have two main access points (inlet and outlet baffles), so you typically need two risers. Some tanks might have a single large manhole, requiring only one large riser. Always expose your tank to confirm the number and location of openings.
Q: Can I install a riser on a plastic or fiberglass septic tank?
A: Yes, risers are available for plastic and fiberglass tanks. The installation method will vary slightly, often involving specific glues or gaskets recommended by the tank manufacturer rather than butyl mastic and concrete anchors. Always follow the tank manufacturer’s instructions for the best seal.
Q: What if my tank opening isn’t perfectly round?
A: Most modern risers are designed for standard round openings. If your tank has an older, irregular, or rectangular opening, you might need to use an adapter plate (often made of fiberglass or plastic) that can be sealed to your existing opening, creating a round surface for the riser.
Q: Will the risers be an eyesore in my yard?
A: Modern septic risers typically come with low-profile, green dome lids designed to blend into most lawns. While they are visible, they are far less disruptive than repeatedly digging up a buried access point. You can strategically landscape around them (avoiding deep-rooted plants) to further minimize their appearance.
Q: Do risers weaken the structural integrity of my septic tank?
A: No. When properly installed and sealed, risers do not weaken the structural integrity of your septic tank. They are designed to sit securely on the existing tank opening and distribute weight evenly. Following manufacturer recommendations and securing them to concrete tanks with anchors ensures their stability.
Septic Tank Riser Installation: A Comparison of DIY vs. Professional Service
| Feature | DIY Septic Riser Installation | Professional Septic Riser Installation |
|---|---|---|
| Cost (per riser) | $95 – $345+ | $300 – $800+ |
| Time Commitment | 4-8+ hours per riser (can be split) | 1-3 hours per riser (typically) |
| Skill Level | Moderate to High (requires excavation, sealing, basic construction) | Low (contractor handles all aspects) |
| Tools Required | Shovel, pry bar, level, drill, caulk gun, safety gear | Contractor provides all specialized tools (e.g., mini-excavator if needed) |
| Safety Risk | Moderate to High (excavation, toxic gases, heavy lifting) | Low (contractor is trained and insured) |
| Warranty/Guarantee | None (DIY work) | Often includes a warranty on labor and materials |
| Permitting | Homeowner responsible for checking and obtaining permits | Contractor often handles permitting process |
| Best For | Shallow tanks, experienced DIYers, budget-conscious homeowners | Deep tanks, complex situations, homeowners seeking peace of mind |
Enhance Your Septic System: Beyond Risers
Installing septic tank risers is a fantastic step towards better septic system management. But don’t stop there! Consider these other ways to optimize your onsite wastewater treatment:
- Septic Tank Additives: Some bacterial additives can help maintain a healthy bacterial balance, especially if you use a garbage disposal or experience periods of low usage. According to research from [Local University or Extension Office], beneficial bacteria are key to efficient septic breakdown. [Link to: Best Septic Tank Treatments]
- Effluent Filters: Installing an effluent filter at your tank’s outlet can prevent solids from entering your drain field, extending its life and reducing pumping frequency. These are highly recommended by many septic professionals.
- Septic Alarm Systems: For advanced aerobic systems or those with pumps, an alarm system can alert you to high water levels or pump failure, preventing costly backups and environmental damage. [Link to: Septic Alarm Systems: What You Need to Know]
Your Action Plan: Enjoy Easy Septic Access!
You’re now equipped with the knowledge to make an informed decision about septic tank riser installation. Whether you choose to tackle it yourself or hire a professional, this upgrade is an investment that pays dividends in convenience, peace of mind, and the longevity of your septic system.
Immediate Steps:
- Locate Your Septic Tank: If you haven’t already, pinpoint your tank’s exact location and access points. Consult your property deed or local building permits if necessary.
- Assess Your Situation: Determine the depth to your current lids and if DIY installation aligns with your comfort level, available tools, and local regulations.
- Gather Materials or Get Quotes: If DIY, start shopping for risers and sealant. If hiring, contact licensed septic professionals for detailed estimates and to discuss permits.
Strong CTA: [Find Licensed Septic Contractors for Riser Installation Near You] – Get free, no-obligation quotes from trusted local experts in [Your Service Area]!
Strong CTA: [Shop Septic Tank Riser Kits & Accessories on Amazon] – Browse top-rated products for your DIY project and get fast delivery!
Disclosure: As an affiliate, Home Septic Solutions may earn a commission from qualifying purchases made through links on this page. Septic regulations vary by county and state. Always check with your local health department or environmental agency for specific requirements and permit needs before commencing work. Attempting to open a septic tank without proper training and equipment is EXTREMELY DANGEROUS due to toxic gases. Always consult a licensed pumper or technician for any work you are uncomfortable performing.
Industry Authority Note: This guide integrates best practices and safety recommendations from the National Onsite Wastewater Recycling Association (NOWRA) and EPA Septic Guidelines (EPA 832-F-00-072). It has been reviewed for accuracy by our team of septic system specialists, including [Expert Name, e.g., Alex Chen, Certified Septic System Inspector].
Leave a Reply