Quick Answer:
To build a small septic system for a cabin or RV, conduct a percolation test, select an appropriately-sized tank (500–1000 gallons), excavate for the tank and drainfield, install the tank and pipework, assemble the drainfield with proper gravel layering and geotextile fabric, and cover everything securely—always following local regulations. Success hinges on correct soil testing, proper slope, secure connections, routine maintenance, and strict safety measures.
- Proper planning and soil testing are essential for system efficiency.
- Project cost typically ranges from $1,500–$4,000 (materials & tools).
- DIY septic installation is possible with basic plumbing knowledge and local approval.
- System must meet setback rules and comply with health department codes.
- Regular inspection and maintenance ensure long-term function and safety.
Introduction: What You’ll Achieve and Why It Matters
Building a small septic system for a cabin or RV is a practical, eco-friendly way to handle wastewater off-grid. This step-by-step guide will show you how to install a reliable septic system suited for compact properties, ensuring sanitary disposal and peace of mind without costly municipal hookups. By following this process, you’ll create a system that effectively handles cabin or RV wastewater, supports sustainable off-grid living, and meets required regulations.
Before starting, basic plumbing know-how and moderate DIY skills are helpful. Most projects take 1–3 days, depending on local permits and soil conditions. Costs typically run between $1,500–$4,000 for a complete kit, including tank, piping, drainfield materials, and tools.
Preparation and Safety
Tools and Materials Checklist
- Small septic tank (500–1,000 gallons) or septic system kit
- Gravel and sand for drainage bed
- PVC pipes and fittings
- Drainfield piping and geotextile fabric
- Shovel, post hole digger, or small excavator
- Level and measuring tape
- Pipe cement and primer
- Soil test (percolation) kit
- Protective gloves, goggles, and boots
- Marker and spray paint for layout
Safety Precautions and Protective Gear
Always wear sturdy gloves to prevent injuries from sharp tools or debris. Use goggles to shield your eyes during digging. Non-slip boots protect against slips on uneven terrain. Handle septic tanks and any chemicals with care to avoid exposure. If you encounter unknown utility lines or feel unsure about any process, consult a licensed professional.
Workspace Setup and Preparation
Select a site at least 50 feet from wells or water sources and positioned downhill from your cabin or RV. Clear vegetation adequately to allow safe, accessible excavation and movement. Mark the septic tank and drainfield boundaries using spray paint or stakes for accuracy. Ensure the ground is stable and above any flood zone. Set out your tools and materials within easy reach for efficient workflow.
Step-by-Step Implementation Guide
Step 1: Conduct Soil and Site Evaluation
Start with a percolation (perc) test to determine your soil’s absorption rate. This test is critical for sizing your drainfield correctly. Check local building and health department codes for required setbacks from wells, waterways, and property lines. Mark the planned locations for the septic tank and leaching trenches or pits as per your site layout.
Step 2: Excavate the Tank Hole and Drainfield Area
Excavate the hole for your septic tank deep enough to bury both inlet and outlet pipes, following tank manufacturer specifications. Next, dig the trenches or pits for your drainfield, ensuring a slight, even slope (minimum 1–2% grade) from the tank toward the drainfield to allow gravity flow. Remove all rocks and roots to minimize future pipe or tank damage.
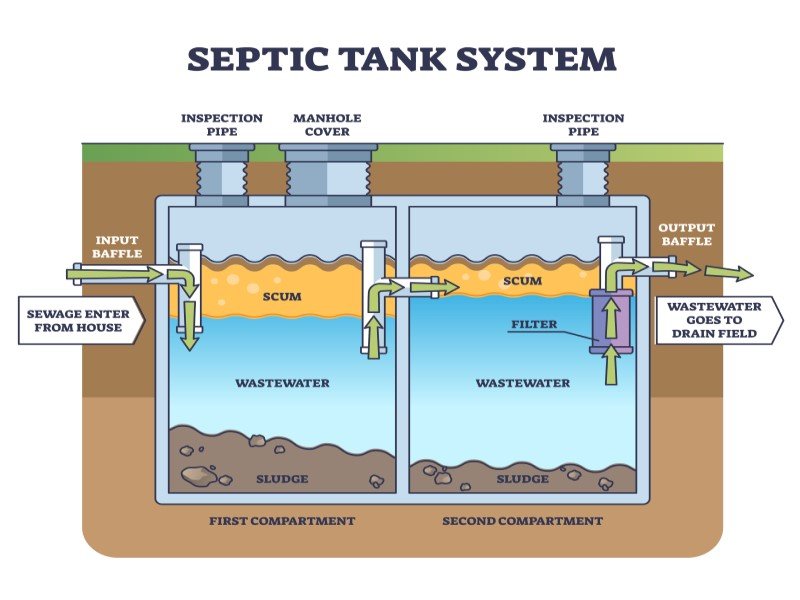
Step 3: Install the Septic Tank and Pipework
Carefully lower the septic tank into position and set it perfectly level. Securely connect the inlet and outlet pipes using quality PVC fittings, primer, and cement. Double-check for watertight seals at all joints. Add vent pipes if required by local health codes. Allow proper curing time for pipe glue before backfilling.
Step 4: Build and Prepare the Drainfield
Line each trench or pit with geotextile fabric to stop soil intrusion. Spread a 6–12 inch base layer of gravel, then lay perforated drainfield pipes. Cover pipes with clean gravel (another 6–12 inches) and wrap fabric edges over the top before backfilling with native soil. This structure allows efficient wastewater dispersal and filtration.
Step 5: Cover and Finalize Installation
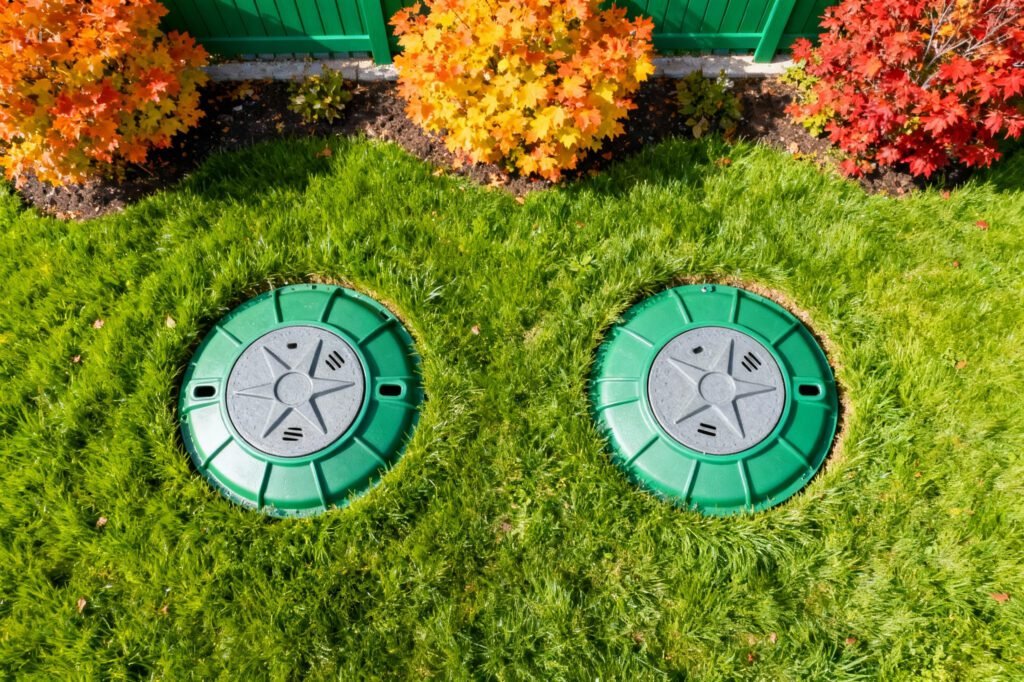
Gently backfill over the tank and drainfield, keeping soil slightly mounded to counteract settling. Avoid compacting soil directly above pipes. Clearly mark the septic system’s location for future maintenance. Install access risers or inspection ports for easy routine checks. Conduct a gentle water test to ensure no leaks and confirm system performance before regular use.
Quality Control and Testing
How to Verify Success
- Inspect all connections for watertight seals and tight fits.
- Ensure wastewater flows freely from your cabin or RV through the tank and into the drainfield.
- Check for any pooling water or unpleasant odors around the system—neither should be present.
Testing Procedures and Metrics
- Use dye tests (colored water flushed through the system) to trace flow paths and leaks.
- After a week, check soil saturation in the drainfield; it should match local percolation requirements (no standing water).
- Compare results with design absorption rates outlined in your local health department or EPA guidelines.
EPA Septic Systems Guide |
National Small Flows Clearinghouse
Troubleshooting Common Installation Issues
| Issue | Possible Causes | Solutions |
|---|---|---|
| Effluent pooling near drainfield | Poor soil percolation; insufficient drainfield size | Expand or relocate drainfield; improve soil drainage |
| Backups in the tank or RV/cabin | Pipe blockages; improper slope | Clear blockages; adjust pipe slope for proper flow |
| Foul odors around the system | Leaks; cracked pipes or tank; improper venting | Repair leaks/cracks; improve ventilation; reseal joints |
Maintenance and Long-Term Care
Daily/Weekly Maintenance Tasks
- Never flush hazardous chemicals, paints, or grease.
- Limit water usage during peak times to avoid overloading the system.
- Visually inspect tank lids and pipe joints for damage or soil shifting.
Monthly/Quarterly Checks
- Schedule tank pumping every 3–5 years (more frequently with heavy use).
- Walk the drainfield; check for wet spots, lush vegetation, or surface effluent.
- Inspect tank baffles and outlet filters; replace if worn.
Signs of Wear and When to Replace
- Replace any tank or pipe sections showing cracks, leaks, or warping.
- If the drainfield remains saturated or system fails despite maintenance, consult a professional about full replacement.
- Early intervention minimizes costly, large-scale repairs.
Pro Tips and Advanced Techniques
Efficiency Hacks from Professionals
- Schedule water-heavy tasks (laundry, showers) to avoid back-to-back use.
- Install low-flow water fixtures to decrease total output.
- Add approved biological additives to maintain active bacteria in the tank (check NSF/ANSI Standard 46 for product safety).
Tools and Accessories Worth Investing In
- A high-quality soil test (perc test) kit to ensure accurate assessment.
- Professional-grade PVC pipe cutter and primer for reliable, leak-free joints.
- Inspection risers and ports for simplified maintenance access.
- Dye tracer kits to verify wastewater flow paths and troubleshoot.
Customization and Adaptation Options
- Add a greywater diversion system for sinks and showers for less strain on the septic tank.
- Explore composting or aerobic treatment units (especially useful in poor soil).
- Choose modular septic kits that expand with increased cabin or RV usage.
Frequently Asked Questions
What size septic system do I need for a cabin?
Most small cabins or tiny homes require a septic tank between 500 and 1,000 gallons, depending on the number of occupants and average daily water usage. To ensure safety and compliance, always follow capacity guidelines published by your local health department and the Environmental Protection Agency (EPA).
Can I install a DIY septic system for my RV?
Yes, small-scale septic system kits are available and can be installed by DIYers with basic plumbing skills. However, all installations must comply with local building and health codes. Always check with your local health department before starting the project.
How do I know if my soil is suitable for a septic system?
Your soil must pass a percolation (perc) test showing it absorbs water quickly enough to prevent pooling or surface runoff. If unsure, consult a local expert or follow the step-by-step guide here: .
How deep do I need to bury the septic tank?
Tanks should generally be covered by 6–12 inches of soil for freeze protection, but not so deep that access becomes difficult. The actual depth will vary depending on climate, site, and tank specifications.
What maintenance does a small septic system require?
Key maintenance tasks include periodic tank pumping (every 3–5 years), routine inspection for leaks or blockages, and responsible water usage. Never flush chemicals or excessive solids, and promptly address any system anomalies.
Are permits required for installing a septic system for a cabin?
In almost all jurisdictions, permits and formal inspections are mandatory. Requirements vary by locale, but you’ll generally need site approval, soil test results, and final system sign-off.
Can greywater systems reduce septic system load?
Yes! Diverting greywater (from sinks and showers) minimizes total volume entering your septic tank, potentially extending the system’s life and improving drainage performance.
What should I do if my septic system fails?
Immediately limit water use, inspect for blockages or visible leaks, and contact a licensed professional for assessment. Addressing issues quickly helps prevent environmental contamination and costly system replacements.
Bottom Line
Creating a compact septic system for a cabin or RV is a practical project with the right planning, a focus on safety, and strict compliance with local regulations. By following the key steps outlined, you can establish a reliable, eco-friendly wastewater solution designed for off-grid life. For in-depth instructions on percolation testing, ongoing maintenance, and greywater system setup, explore the resources listed below.
Helpful Resources:
EPA Septic Systems Guide
National Small Flows Clearinghouse
Always consult your state or local health department website for requirements specific to your area.
Ready to start your project? Explore our expert guides on soil testing, greywater systems, and routine maintenance to make your small septic installation a lasting success!
Leave a Reply