Quick Answer: To inspect a septic system as a buyer or homeowner, visually check the drainfield for wet spots, ensure tank lids and access points are secure and intact, evaluate effluent filter and baffle conditions, measure sludge and scum levels, look for signs of leaks or backups, review water usage, verify system age and maintenance history, examine surrounding soil and vegetation, and confirm compliance with local health codes. Annual visual checks are recommended, with professional inspections every 3–5 years, per EPA and local health department guidelines.
- Drainfield failure is the most costly and common septic system issue—always inspect for ponding or unusual plant growth.
- Tank access, integrity, and effluent filter condition are critical for safe maintenance and longevity.
- Regular maintenance prevents expensive repairs and protects property value.
- Combining basic homeowner checks with professional service ensures reliability and code compliance.
Table of Contents
Understand Why These 10 Septic System Inspection Items Matter
Did you know a missed septic issue can turn a dream home into an expensive nightmare? Whether you’re purchasing a property or maintaining your current one, a comprehensive septic system inspection protects your investment and safeguards your family’s health. This expert-approved checklist draws from 2024 EPA and CDC recommendations, distilling the ten most essential inspection items. Use it to confidently conduct a basic assessment or to communicate knowledgeably with inspectors. Proactive attention now can save you future headaches, repair costs, and prevent groundwater contamination.
Follow the Complete 10-Point Septic System Inspection Checklist
| # | Inspection Item | What to Look For | Who Should Inspect |
|---|---|---|---|
| 1 | Drainfield Condition | Soggy areas, standing water, or lush/unusual vegetation | Homeowner & Professional |
| 2 | Septic Tank Access & Integrity | Secure, intact lids; cracks or leaks; easy access per local code | Homeowner & Professional |
| 3 | Effluent Filter Condition | Clogs or buildup; clean or replace as needed | Professional (Homeowner for basic check) |
| 4 | Inlet & Outlet Baffles | Blockages, missing or deteriorating baffles | Professional |
| 5 | Tank Scum & Sludge Levels | Excessive buildup; reduce capacity and risk of solids outflow | Professional |
| 6 | Signs of Leakage or Backup Indoors | Slow drains, sewage odors, wet spots near fixtures | Homeowner |
| 7 | System Usage & Water Conservation | High water use patterns; lack of water-saving devices | Homeowner & Professional |
| 8 | Age & Maintenance History | Review records, frequency of pumping/service | Homeowner & Professional |
| 9 | Soil & Vegetation Around System | Intrusive tree roots, saturated soil, improper grading | Homeowner & Professional |
| 10 | Local Code Compliance & Permits | Documentation, installation or repair permits, code updates | Professional / Local Agency |
Analyze Key Septic System Inspection Components
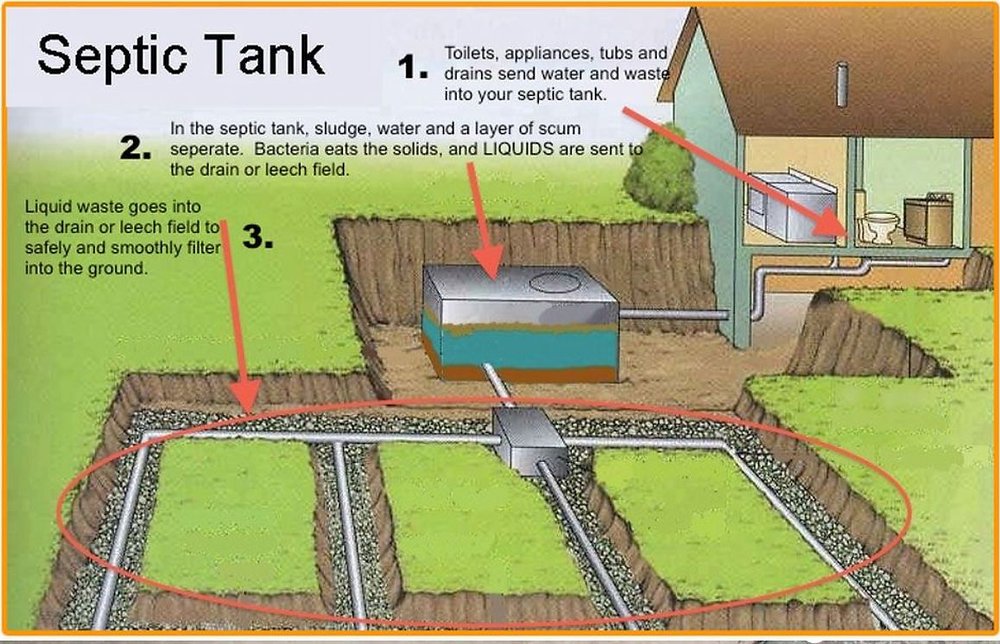
1. Assess Drainfield Condition – Priority #1
The drainfield safely disperses treated wastewater into the soil. Walk over the area and look for pooled water, unusually green grass, or muddy/soggy spots after dry periods. These signs point to impending drainfield failure, which the EPA notes is the most expensive septic repair and a risk to local groundwater (EPA Septic Systems Guide, 2024).
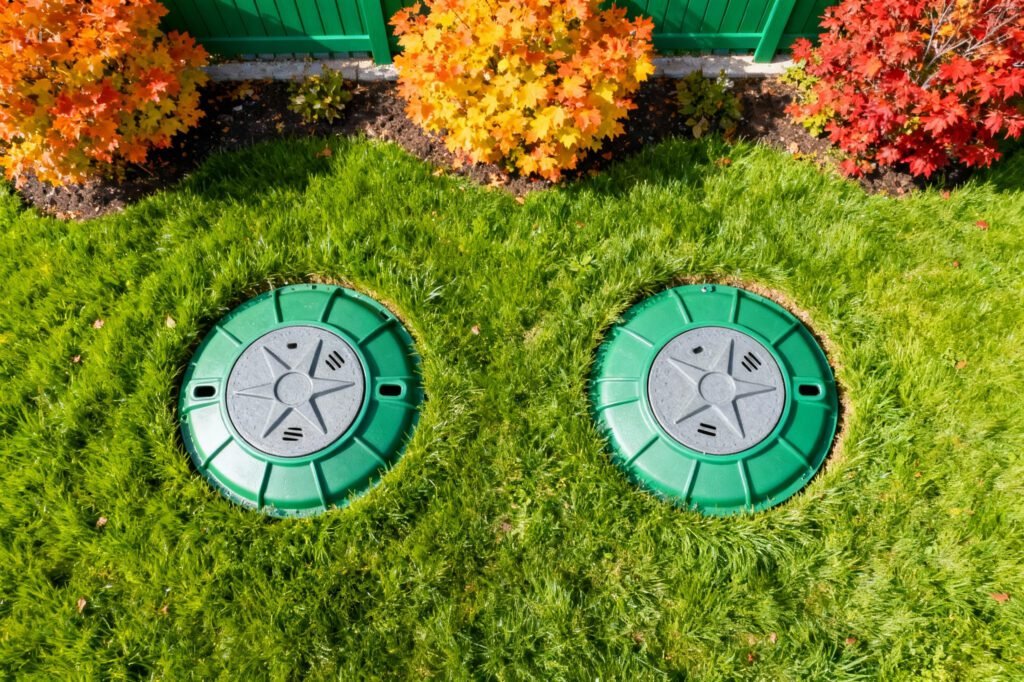
2. Check Septic Tank Access and Structural Integrity
Locate and inspect tank lids—they should be solid, lockable, and flush with the ground for safety and routine pumping. Examine the area for cracks, visible leaks, and corrosion. Damaged lids threaten children and pets and signal potential contamination or non-compliance with local regulations.
3. Confirm Effluent Filter Condition
Modern septic tanks (especially since 2010 per NSF standards) feature an effluent filter that traps solids before they reach—and clog—the drainfield. Ensure the filter is present, inspect for debris, and clean as part of professional service. Neglect here allows solids through, raising failure risk.
4. Inspect Inlet and Outlet Baffles Function
Baffles guide waste water flow and block debris from exiting the tank. Damage, blockages, or missing baffles cause improper filtration—one of the core contributors to system failure noted by the National Onsite Wastewater Recycling Association (NOWRA, 2024).
5. Measure Tank Scum and Sludge Levels
Use a sludge judge or dipstick to gauge buildup. If solids occupy more than a third of the tank, schedule pumping. The Centers for Disease Control and Prevention recommends professional assessments every 3–5 years, or sooner for larger households (CDC Septic System Safety, 2024).
6. Identify Leakage or Backup Warning Signs in the Home
Monitor for slow/blocked drains, foul sewage odors, or moisture around plumbing fixtures. These symptoms frequently reveal tank overfill, failed drainfield, or broken pipes. Early attention limits health hazards and environmental risk.
7. Review System Usage and Water Conservation Efforts
Excessive water flow inundates the tank faster than it can process. Ensure the home uses water-efficient fixtures and avoid running multiple high-use appliances/draws simultaneously. Simple practices like staggered laundry loads reduce strain and repair risk.
8. Investigate System Age and Maintenance History
Ask for service and pumping records, including installation date. Older systems or those lacking regular inspection are proven to fail at higher rates (EPA, 2024). Use this information to create a future service plan.
9. Examine Soil and Vegetation Conditions Surrounding the System
Roots from trees/bushes may invade and damage pipes or the tank. Excess soil moisture prevents proper wastewater dispersal. Adjust landscaping or seek professional evaluation if problem vegetation is nearby.
10. Confirm Local Code Compliance and System Permitting
Always check for documentation and valid permits related to septic installation, repairs, and upgrades. Systems not up to current health codes can delay home sales or require expensive updates. Contact your local health department for region-specific standards (EPA Septic Systems Guide).
Compare Major Septic Inspection Areas
Spot Shared Patterns and Prevention Strategies
Most checklist items tackle preventing solids from migrating into effluent lines, sustaining structural integrity, and keeping wastewater dispersion unobstructed. Keeping scum/sludge minimized and parts intact offers the best value in maintaining your system.
Evaluate Cost vs. Value for Inspection Tasks
| Inspection Task | Average Cost | Potential Savings |
|---|---|---|
| Effluent Filter Cleaning | $75–$150/service | Prevents $7,000+ drainfield replacement |
| Annual Visual Survey | Free (DIY) | Flags small leaks before they worsen |
| Pumping Every 3–5 Years | $300–$600/event | Increases overall septic lifespan |
| Drainfield Replacement (if needed) | $4,000–$14,000 | — |
Understand Inspection Skill Levels
- Basic tasks for homeowners: Visual drainfield inspection, monitoring drains/odors, checking tank lid security
- Requires professional tools/expertise: Baffle and effluent filter inspection, measuring sludge/scum depth, confirming code compliance
Consult a licensed septic professional if in doubt—especially when buying a new home or if any red flags appear.
Honorable Mentions: Additional Septic Inspection Considerations
- Tank Alarm System Check: Not all systems include alarms, but if present, test functionality at inspection time.
- Household Chemical and Grease Assessment: Avoid pouring grease or harsh chemicals down drains, as these disrupt bacterial processing.
- Septic Additives: Most have limited benefit per EPA research, so focus on proven maintenance.
- Secondary/Backup Drainfields: Inspect only if your system is equipped with an alternate dispersal area.
Maximize Results: How to Use This Septic Inspection Checklist
Prioritize Items According to Your Situation
If your system is older, focus on tank condition and sludge levels. New buyers should emphasize drainfield status and code compliance. Customize your inspection priorities for maximum impact.
Set Realistic Inspection and Maintenance Timelines
- Perform DIY visual checks once a year
- Schedule professional pumping and inspection every 3–5 years, sooner if issues arise
- Keep a written maintenance log for reference and future buyers
Avoid Common Septic Inspection Mistakes
- Don’t delay if you notice standing water, odors, or slow drains—address concerns promptly
- Don’t attempt to open or enter tanks without proper safety gear and training (per CDC)
- Never skip recommended pumping intervals
Get the Most Benefit by Combining Checklist Steps
Link your annual checklist reviews with water-saving upgrades and professional service visits. This approach maximizes septic system reliability and regulatory compliance, while minimizing future repair costs.
Frequently Asked Questions
What does a septic system inspection typically cover?
A standard inspection evaluates tank integrity, scum/sludge levels, baffles, effluent filter, drainfield, water usage, and checks for leaks or blockages.
How often should I inspect my septic system?
Visually inspect annually. Schedule professional service and pumping every 3–5 years, as recommended by the EPA and local health boards.
Can I perform a septic system inspection on my own?
You can handle basic visual checks, but tasks like measuring sludge depth, inspecting baffles, and verifying code compliance are best left to professionals.
What are common signs of septic system failure?
Slow drains, sewage odors, standing water above the drainfield, system backups, and excessive vegetation indicate likely failure.
How does septic system maintenance prevent costly repairs?
It removes solids before they escape the tank, protects the drainfield, and catches minor issues early per EPA and CDC guidelines.
Should I be concerned about local code compliance?
Yes—compliance ensures health and safety, is mandatory in many jurisdictions, and affects home sales and financing.
What happens if I ignore minor septic problems?
Issues often escalate, resulting in major failures, property damage, and environmental harm—costs rise dramatically when early symptoms are ignored.
Related Lists to Review
- Septic System Maintenance Tips for Homeowners
- Top 7 Signs Your Septic System Needs Repair
- Advanced Septic System Troubleshooting and Repair Guide
External Resources for Further Guidance
- Environmental Protection Agency (EPA) Septic Systems Guide
- National Onsite Wastewater Recycling Association (NOWRA) Resources
- Centers for Disease Control and Prevention (CDC) Septic Systems Safety
Key Takeaways
- Use this 10-point checklist annually to prevent most septic system failures and maximize system life.
- Schedule professional inspections and pumping every 3–5 years—don’t wait for obvious problems.
- Regular maintenance and early intervention protect health, property value, and the environment.
- Always consult local codes and certified professionals for safety and compliance.
Ready to protect your property and your wallet? Download our printable 10-point septic system inspection checklist or book a licensed septic inspection with a trusted local professional today!
Leave a Reply