Quick Answer: To design a compliant and efficient septic system, conduct a soil percolation test, select a properly sized tank, respect all setback distances from wells and property lines, and design the drain field based on site-specific soil data. Always obtain necessary permits and use approved materials, following EPA guidelines and local regulations.
- Soil evaluation is critical: it determines system layout, size, and drain field design.
- Setbacks prevent groundwater and well contamination.
- Proper tank sizing and location ensure long-term functionality.
- Regular testing and maintenance safeguard environmental and system health.
- Optimized layouts can adapt to small lots and difficult soils.
Table of Contents
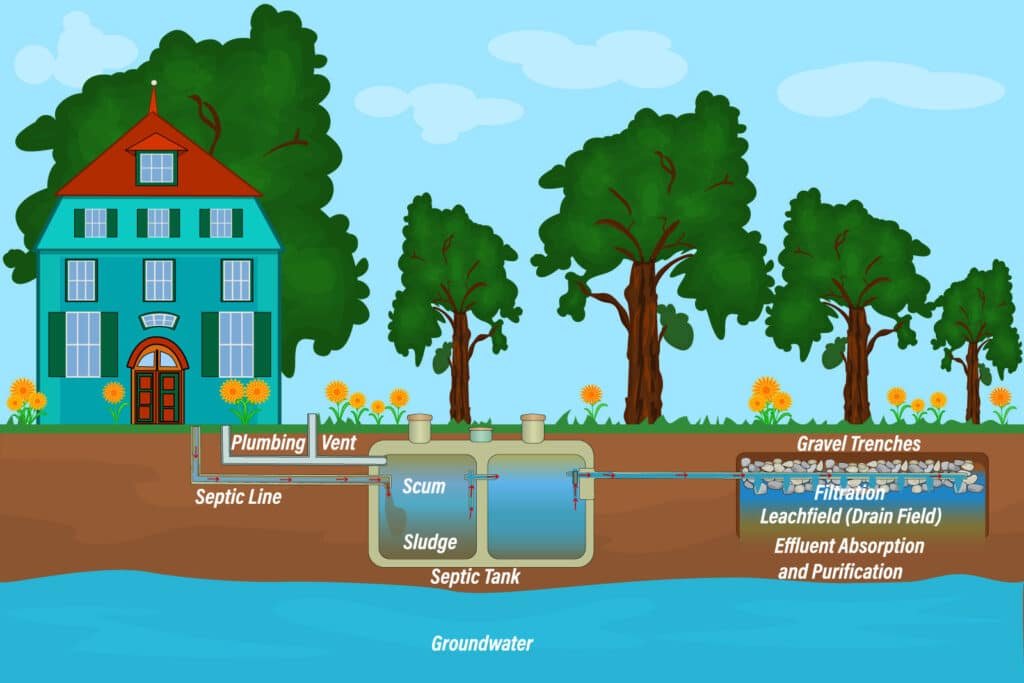
Ever wondered what truly makes a septic system functional and durable? Whether you’re planning a new build or upgrading an older property, strong septic system design isn’t just about placing a tank underground—it’s about understanding the science and regulations that protect your property, health, and local environment. In this expert guide, you’ll discover how the interplay between tanks, drain fields, and site conditions shapes every successful installation. Don’t risk costly failures—master the core principles before you dig.
Preparation and Safety
Gather Tools and Materials
- Measuring tape, site plan maps
- Soil testing equipment (auger, percolation kits)
- Level and laser level
- Stakes, flags, marking paint
- Shovels, digging tools
- Personal protective equipment (gloves, safety glasses, steel-toed boots)
- All septic tank and drain field components (as per design)
- Notebook, camera, regulatory datasheets
Follow Safety Requirements
Septic system installation and excavation carries risk of injury and contamination. Wear heavy-duty gloves, eye protection, and steel-toed boots. Always check for underground utilities before digging—contact local utility “call before you dig” services. Never enter unshored trenches due to risk of collapse (as noted by OSHA standard 1926.651). Limit dust inhalation, and handle septic components to prevent accidental spillage or material contact.
Set Up Your Work Area
Remove vegetation and debris from your installation zone. Clearly mark tank and drain field boundaries with stakes or flags based on your detailed layout plan. Leave clear access routes for machinery but avoid compacting soil in drain field locations. Confirm permit and site approvals from your local environmental health or permitting authority before proceeding.
Step-by-Step Implementation Guide
Step 1: Assess Site Conditions and Soil Suitability
- Conduct percolation tests and dig soil profile holes to measure drainage and establish soil texture.
- Assess for groundwater level, impermeable layers, or restrictive horizons.
- Document results as required for permitting.
Matching your system design to actual soil absorption rates prevents groundwater contamination and ensures effective wastewater treatment (EPA, 2022).
Step 2: Determine Septic Tank Sizing and Location
- Calculate required tank size using expected daily wastewater flow (see EPA Table 4-2, EPA Onsite Wastewater Treatment Manual).
- Respect minimum setback distances: e.g., 50-100 feet from wells, 10-15 feet from property lines (consult local code).
- Ensure accessibility for routine pumping and inspection.
Proper sizing prevents overflow and untreated effluent discharge. Always locate tanks for ease of future access and away from sensitive features.
Step 3: Design and Layout the Drain Field
- Use soil permeability data to size drain field area per local code or EPA guidance.
- Layout trenches or beds to promote even flow distribution and prevent oversaturation.
- Grade lines for optimal gravity flow; add pumps for sloped or difficult terrain.
Proper drain field design is essential for final effluent polishing and groundwater protection.
Step 4: Prepare the Excavation and Install Components
- Excavate tank and trenches to precise depth and slope, ensuring level and undisturbed bottoms.
- Install tanks, connect plumbing, and lay drain field piping atop graded gravel bedding.
- Utilize filter fabric over gravel beds where required to prevent soil intrusion.
Step 5: Cover and Restore the Site
- Carefully backfill over system components to avoid shifting or damage.
- Lightly compact soil on drain field, and restore with native grass cover to minimize erosion.
- Ensure tank risers, inspection ports, and markers remain visible and accessible.
Quality Control and Testing
How to Verify a Successful Installation
- Inspect all components for alignment, damage, and correct placement versus your approved plans.
- Look for absence of leaks, ponding, or unpleasant odors during and after backfill.
- Monitor over subsequent weeks for performance issues.
Testing Methods and Performance Metrics
- Post-install percolation verification to assure field can absorb expected volume.
- Perform dye tracer and hydraulic load tests if needed.
- Measure effluent biological oxygen demand (BOD) per EPA recommendations.
Testing ensures your system complies with EPA and local environmental health standards.
Troubleshooting Installation Issues
- Fix uneven trenches or pipe blockages to avoid localized flooding or dead spots.
- If percolation rates are insufficient, redesign drain field or amend soil as allowed.
- Reevaluate field layout if you notice odors or surface pooling after installation.
Maintenance and Long-Term Care
Ongoing Daily/Weekly Maintenance Tasks
- Walk site for evidence of standing water, lush vegetation, or odors—early warning signs of trouble.
- Practice responsible waste disposal: avoid grease, wipes, and chemicals that disrupt system balance.
- Keep vehicles and heavy objects off the drain field to maintain soil porosity.
Monthly or Quarterly System Checks
- Visually inspect tank risers, lids, and field vent pipes for cracks or blockages.
- Arrange professional septic pumping every 3–5 years, or as system demand increases.
- Clear any debris from vent stacks, filters, and observation ports.
Identifying Signs of System Wear or Failure
| Indicator | Potential Problem | Action Required |
|---|---|---|
| Pooling water/soft ground | Drain field saturation or clog | Schedule professional evaluation |
| Persistent odors | Leak, clog, or field overload | Inspect for blockages, pump tank |
| Slow drains/backups | Sludge buildup or line blockage | Pump tank, check inlet/outlet |
| Lush, green grass over field | Overly wet soil, effluent surfacing | Examine for leaks, reroute flows |
Pro Tips and Advanced Techniques
Boost Efficiency with Expert Tactics
- For marginal soils, use sand filters or engineered wetlands per EPA alternative system guidance.
- Gravity flow reduces maintenance and energy needs.
- Comprehensive photo and note documentation streamlines future inspections and repairs.
Recommended Tools and Accessories
- Soil augers and moisture meters for objective site assessments.
- Laser levels to ensure accurate trench gradation.
- Inspection cameras for drain and pipe checks (non-destructive).
- Durable tank risers for easy, long-term inspection access.
System Customization and Adaptation Options
- Consider chamber or mound systems for small lots or poor drainage sites.
- Smart sensors or alarms for proactive leak/failure alerts.
- Tighten system layout in difficult topographies while maintaining minimum required setbacks and drain area.
Frequently Asked Questions
What is the importance of setbacks in septic system design?
Setbacks—minimum required distances between septic tanks/drain fields and wells, water bodies, or property lines—are mandated to prevent groundwater contamination and protect public health. They also allow safe maintenance access, as emphasized by the EPA and local code requirements.
How do soil types affect septic system layout and drain field design?
Soil texture and permeability control how efficiently effluent is absorbed, treated, and filtered. Sandy soils drain rapidly but may require larger fields; clay-heavy soils restrict drainage, risking surface pooling and system failure. Proper design matches system type and drain field dimensions to site conditions per local and EPA standards.
Can a septic system be designed for a small lot?
Yes. Specialized systems such as mound setups or chamber-style drain fields can accommodate small, challenging lots by concentrating the treatment process and adjusting to available space while still adhering to regulatory setbacks and treatment effectiveness.
How often should a septic tank be pumped and inspected?
Septic tanks should typically be pumped every 3–5 years, depending on household size and water use. Inspect tanks annually for structural integrity and effluent levels to prevent solids from reaching and clogging the drain field.
What are the signs that my septic drain field is failing?
Common signs include standing water above the drain field, foul odors, unexpectedly green or soggy grass, slow drains, or sewage backups indoors. Any of these require prompt professional evaluation and corrective action.
Why is soil percolation testing required for septic designs?
Soil percolation testing measures the rate at which soil can absorb liquid. These results dictate both drain field sizing and feasibility, ensuring that your system can safely handle household waste without surfacing or contaminating groundwater—required by EPA and most local health ordinances.
What maintenance considerations should I keep in mind for long-term system health?
Never flush non-biodegradable materials, avoid water overuse, keep heavy vehicles off the drain field, and adhere to regular inspection and pumping schedules. Consistent best practices prolong system life and prevent expensive, hazardous failures.
Helpful Resources and Further Reading
- EPA: Septic Systems Overview
- National Onsite Wastewater Recycling Association (NOWRA)
- CDC: Home Septic Systems and Health
Related Guides
- Understanding Septic Tank Maintenance Essentials
- How to Test Soil for Septic System Suitability
- Small Lot Septic System Solutions: Design and Installation
- Drain Field Repair and Replacement Guidelines
- Local Regulations and Permits for Septic Installation
Quick Recap:
- Effective septic system design starts with a thorough understanding of soil and site conditions—never compromise on percolation testing or regulatory setbacks.
- Proper tank sizing, correct drain field layout, and diligent maintenance ensure system longevity and environmental safety.
- Compliance with EPA, local health departments, and nationally recognized standards such as NSF/ANSI 40 is essential for both performance and legal protection.
- Choose professional consultation or engineering design whenever in doubt or for complex sites.
By applying these septic design fundamentals, you add value to your property, protect local groundwater, and prevent costly system failures for years to come.
Ready to start your septic system project? Check out our step-by-step installation visuals, advanced troubleshooting tips, or connect with licensed local professionals for site-specific assistance!
Leave a Reply