
Quick Answer: If you are transitioning from a septic system to a public sewer, expect to pay $1,000–$5,000+ for the sewer hookup and $3,000–$10,000 to abandon your septic tank safely. The process includes permit applications, professional pumping and abandonment, trench excavation, and code-compliant plumbing connections—tasks requiring licensed contractors for both legal and safety reasons.
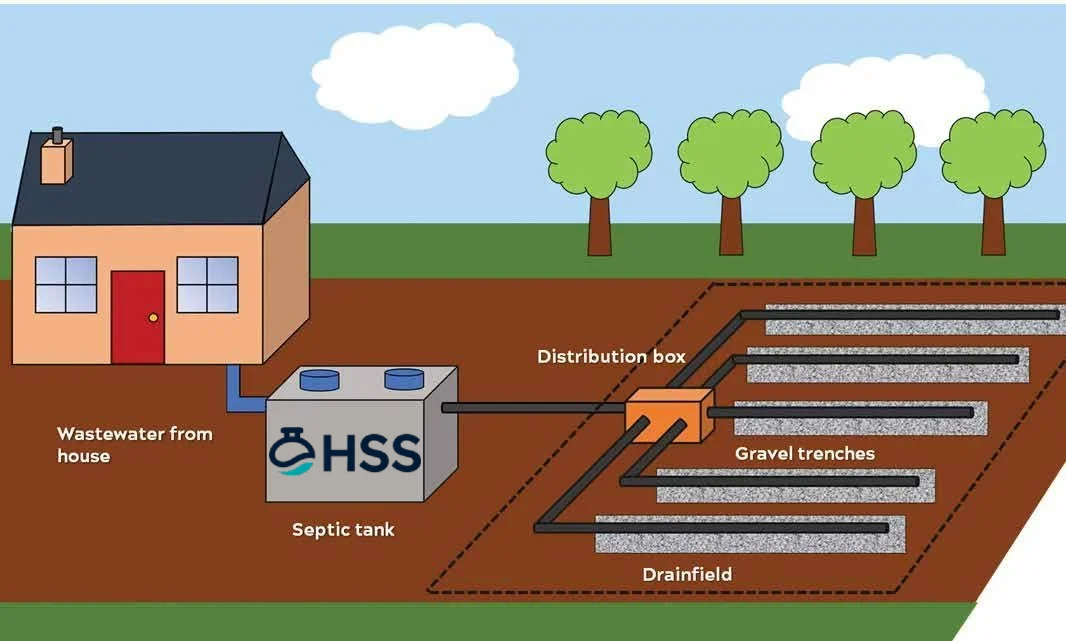
- Septic systems treat wastewater onsite; public sewers deliver it to a municipal treatment plant
- Switching increases long-term reliability and reduces personal maintenance, but involves up-front costs
- Permitting, proper abandonment, and code-compliant installation are required for legal and environmental safety
- Professional help is mandatory for most steps; DIY is limited to basic prep work
Table of Contents
Are you a homeowner wondering whether to stick with your septic system or make the switch to public sewer? With increasing urban expansion and changing regulations, more neighborhoods are being offered the option—or required—to connect to municipal sewer lines. Understanding the crucial differences, key benefits, installation and abandonment costs, and the professional steps required to connect will help you make the best decision for your home, your budget, and your community’s safety.
This comprehensive guide breaks down the process step by step, summarizes the pros and cons of both systems, and explains how to manage your project safely and in compliance with local and federal environmental guidelines—including expertise from the EPA, CDC, and your local wastewater authority.
Assess Preparation and Safety Requirements
Gather Essential Tools and Materials
- Heavy-duty gloves and protective eyewear
- Pipe wrenches and pliers
- Pipe cutters and saws for PVC piping
- Shovels and trenching tools
- Sewer pipe fittings and connectors
- Septic tank pumping equipment (use licensed service)
- Backfill materials (gravel, sand)
- Safety cones and barriers
- Permits and all required project documentation
Follow Critical Safety Precautions
Septic and sewer work exposes you to hazardous waste and presents excavation risks. Always:
- Wear gloves, boots, and protective eyewear
- Avoid contact with sludge or wastewater
- De-energize electrical circuits near work areas
- Use caution when lifting—pipes and concrete can be heavy
Refer to CDC Septic System Safety Guidelines for more on risk management.
Set Up a Safe, Efficient Workspace
- Mark all underground utility lines (“Call Before You Dig”)
- Erect safety barriers and post signage
- Clear debris from access points
- Arrange certified septic pumping before any system abandonment
- Secure all required permits and notify neighbors if needed
Compare Septic Systems and Public Sewers: Key Differences Table
| Feature | Septic System | Public Sewer |
|---|---|---|
| Treatment Location | Onsite (homeowner property) | Offsite (municipal facility) |
| Maintenance | Homeowner responsible | Handled by city/utility |
| Upfront Cost | $3,000–$10,000 (installation) | $1,000–$5,000+ (connection fee) |
| Ongoing Fees | Regular pump-out, repairs | Monthly utility bill |
| Environmental Impact | Localized, may contaminate if failed | Advanced treatment, lower risk |
| Longevity | 20–40 years with maintenance | Indefinite; city maintained |
| Property Value Impact | Potentially lower in city | Higher—preferred in most areas |
Follow the Step-by-Step Sewer Connection Process
Step 1: Obtain Permits and Confirm Sewer Line Availability
Contact your local wastewater authority to:
- Verify public sewer service at your address
- Apply for connection and abandonment permits
- Review connection and inspection fee schedule
- Request pre-connection inspection if required
Step 2: Schedule Septic Tank Pumping and Inspection
Engage a licensed professional (see NAWT certified providers) to:
- Pump out all tank contents
- Assess the septic tank’s structure
- Determine if removal or fill-in-place is required based on local health codes
Step 3: Excavate Access to the Septic and Sewer Lines
Hire excavation professionals to dig trenches from your home to:
- The old septic tank
- The municipal sewer stub-out or connection point
Excavation must meet depth/slope specs for effective drainage (usually 1%–2% slope per EPA standards).
Step 4: Disconnect and Abandon the Septic System Safely
Following EPA and local regulations:
- After pump-out, fill the tank with gravel/concrete, or remove if required
- Disconnect and cap pipes leading to the tank
- Arrange inspection before backfilling the area
Step 5: Connect House Plumbing to Public Sewer Line
- Install code-compliant sewer pipes and connectors from home to street/main
- Ensure pipes have proper slope and water-tight joints
- Request inspection before backfill
- Restore landscaping or pavement as needed
Ensure Quality Control and Testing
How to Verify a Successful Connection
- No leaks or odors at joints and cleanouts
- All fixtures drain smoothly—run water in sinks, tubs, and flush toilets
- Final inspection approval from local authorities
Recommended Testing Procedures
- Request camera rodding to confirm pipe integrity
- Flow tests: verify all fixtures discharge without delay or backflow
- Monitor for 24–48 hours for signs of backup after connection
Troubleshoot Common Installation Issues
- Slow drains or backups: check for debris or pipe slope error
- Odors: inspect for loose or disconnected venting systems
- Visible leaks or ground settling: consult a licensed professional immediately
Establish Maintenance and Long-Term Care
Daily and Weekly Maintenance Tasks
- Monitor for slow drains or foul odors indoors
- Avoid flushing non-biodegradable items or grease
Monthly and Quarterly Inspections
- Inspect outdoor cleanouts for signs of damage or blockage
- Schedule periodic line camera inspections based on municipal guidance
Recognize Signs of Wear and When to Replace Components
- Cracks or corrosion in pipes/cleanouts
- Unexplained soggy spots or sinkholes above sewer line route
- Repeated backups or strong sewage odors
Prompt repairs help prevent property and environmental damage.
Apply Pro Tips and Advanced Techniques
Boost Efficiency and Quality Like a Pro
- Use flexible coupling adapters for easier, aligned connections
- Schedule inspection during dry weather for most accurate tests
Recommended Tools and Accessories
- Consider a sewer inspection camera for preemptive troubleshooting
- Invest in quality wrenches and trenching gear to speed up work
Adapt Systems for Complex Properties
- For hilly sites, consult on pump-assisted sewer assemblies
- Explore alternative onsite treatment if sewer is unavailable or impractical
Frequently Asked Questions
What are the main differences between a septic system and a public sewer?
A septic system treats and disperses wastewater onsite with homeowner responsibility for maintenance.
A public sewer system collects wastewater via pipe network and sends it to a municipal treatment plant, reducing the homeowner’s individual maintenance workload but requiring payment of hook-up and utility fees.
How much does septic system installation typically cost?
A new septic system installation typically costs $3,000–$10,000, depending on tank type, soil condition, and regulatory requirements. This does not include regular pump-out and maintenance expenses. Refer to EPA guidelines for installation standards.
What costs are involved in abandoning a septic system and connecting to sewer?
Expect $3,000–$10,000 for septic tank abandonment (pumping, removal or fill-in, capping, inspection) plus $1,000–$5,000 or more for a public sewer hookup. Regional excavation and contractor fees vary.
Can I connect to the public sewer myself?
Most jurisdictions require licensed, bonded professionals for all sewer connection work and septic abandonment to ensure compliance with EPA/local codes. DIY is generally restricted to preparatory steps.
How long does it take to switch from a septic system to sewer?
The average timeline spans several weeks to a few months to allow for permitting, pumping, excavation, pipe installation, inspections, and backfill. Delays can occur due to scheduling or adverse weather.
What happens if I don’t properly abandon my septic tank?
Improper abandonment can cause soil and water contamination, methane buildup, or tank collapse. These hazards can lead to legal liabilities and expensive environmental remediation as noted by the EPA.
Are there environmental benefits to connecting to public sewer?
Yes. Public sewers typically provide advanced wastewater treatment that significantly reduces water contamination risks, especially in densely populated areas, compared to isolated septic systems (EPA, 2023).
How do I maintain my new sewer connection after switching?
Avoid flushing grease, wipes, or harsh chemicals. Schedule periodic professional inspections, and notify your utility immediately if you experience blockages, backups, or foul odors.
References and Further Reading
- EPA Onsite Wastewater Treatment Systems
- CDC Septic System Safety Guidelines
- National Association of Wastewater Technicians: Septic Certification
Key Takeaways
- Switching from septic to sewer reduces personal risk and maintenance responsibilities but requires regulatory compliance and professional installation costs.
- Always secure the correct permits, abandon your old septic system safely according to local codes, and hire qualified contractors.
- Ongoing care—regular monitoring and prompt attention to leaks or odors—ensures the longevity of your sewer connection and protects your investment.
- Public sewer connections offer enhanced environmental safeguards and add potential value to your home.
Ready to start your transition or want advice specific to your location?
For professional guidance and a detailed quote, consult your local wastewater authority and licensed contractors. Visit our step-by-step permit application guide or contact us for contractor referrals!
Leave a Reply