Quick Answer:
A septic system vent pipe releases hazardous sewer gases safely above your home, balances air pressure in drain lines for proper wastewater flow, and helps prevent odors and drain issues. Obstructions or damage can cause inside odors, slow drainage, or gurgling sounds—routine inspection, safety precautions, and knowing when to call a professional are essential for troubleshooting.
- Septic vent pipes are vital for safe gas release and drain system performance.
- Common problems include clogs (debris, ice), leaks, or damaged vent stacks.
- Symptoms: odors indoors, gurgling, or slow drains signal vent issues.
- Proper tools, safety gear, and methodical troubleshooting improve outcomes.
- Persistent or dangerous issues require licensed professional evaluation.
Table of Contents
Systematic Troubleshooting Philosophy
Proper maintenance and troubleshooting of septic system vent pipes demand a methodical approach to accurately diagnose problems, minimize health and property risks, and restore function efficiently. A systematic process reduces guesswork, avoids unnecessary repairs, and, most importantly, protects homeowner safety.
Safety must always come first. Septic vents release potentially hazardous gases—including hydrogen sulfide and methane, according to the EPA—that can be lethal in high concentrations. Always wear protective equipment, ensure adequate ventilation, and be aware of confined space dangers. If you detect strong sewer odors indoors or suspect a vent blockage, carefully assess safety before taking action.
Know when to stop and call a professional. Issues involving complex repairs, dangerous roof access, or severe odors after troubleshooting should be handled by licensed plumbers or septic system specialists. This is both safest and most cost-effective.
Quick Symptom Index
| Symptom | Possible Causes | Jump Link |
|---|---|---|
| Sewer gas odor inside home | Clogged or damaged vent pipe; missing vent | Diagnostic Tools and Preparation |
| Gurgling sounds in drains | Trapped air due to vent blockage or pipe damage | Common Issues and Solutions Catalog |
| Slow drainage | Improper venting; partial clog in vent or drain pipe | Common Issues and Solutions Catalog |
| Roof vent stack blocked | Leaves, bird nests, debris | Diagnostic Tools and Preparation |
| Excessive moisture on vent pipe | Crack or damaged sealing | Parts Replacement and Repair Guide |
Diagnostic Tools and Preparation
Essential Tools for Diagnosis
- Pipe auger (plumber’s snake) – clears vent obstructions
- Inspection camera – for in-pipe visual inspection
- Ladder with safety harness – essential for roof vent access
- Flashlight and inspection mirror – for visibility in tight areas
- Basic hand tools: wrenches, screwdrivers, pliers
- Soap solution spray – bubbles reveal gas leaks at joints
Safety Equipment Required
- Respirator mask rated for sewer gases (per CDC recommendation)
- Protective gloves and chemical splash goggles
- Non-slip, insulated footwear
- Roof safety harness/fall protection gear
- Portable carbon monoxide detector
How to Create a Testing Environment
- Open windows and doors for thorough ventilation indoors
- Isolate plumbing—pause water use during testing
- Secure roof access: clear debris, inspect for stability, wear harness
- Use gas/leak detector at vent and inside to confirm gas migration
Documentation Template for Findings
- Date/time of inspection
- Symptoms observed; areas inspected
- Tools and diagnostic techniques used
- Inspection images or instrument readings
- Temporary fixes and their effectiveness
- Professional recommendations (as needed)
Common Issues and Solutions Catalog
Issue 1: Performance Problems
- Symptom: Slow drains or sewage backup
- Solution: Inspect vent pipe for obstructions; clear using auger or water flush. Verify pipe diameter is code-compliant (see Plumbing & Drainage Institute).
Issue 2: Noise Issues
- Symptom: Gurgling sounds in drains
- Solution: Caused by air trapped due to vent blockage or connection failure. Inspect pipe for debris, nests, or cracks; clear or repair as needed.
Issue 3: Leakage Problems
- Symptom: Water/moisture leaks near vent pipe joints or roof penetrations
- Solution: Check for deteriorated seals or cracked flashing. Replace faulty seals or sections to prevent water intrusion.
Issue 4: Electrical/Failure Issues
- Symptom: Malfunctioning septic aerators or pumps related to blocked vents
- Solution: Confirm vent integrity; clogged vents can reduce pump effectiveness. Clear and maintain vents; inspect related electrical components using appropriate testing tools.
Advanced Diagnostic Techniques
Multimeter and Test Equipment Use
Test the electrical components (aerators, fans) associated with the vent system. Use a multimeter to ensure correct voltage, continuity, and resistance per manufacturer specs. Always disconnect power before testing.
Pressure Testing & Leak Detection
Use low-pressure testing equipment to check vent integrity—apply soap solution to welded or joined areas; bubbling indicates leakage. Avoid over-pressurizing fragile piping.
Smart Sensors & Diagnostic Apps
Many modern septic systems integrate sensors and companion apps, helping homeowners monitor airflow, gas readings, and system warnings. Check compatibility and follow instructions for accurate digital diagnostics.
Interpreting Error Codes
Reference your system’s manual for error codes related to vents or airflow. Codes often indicate frozen, blocked, or otherwise non-functioning vents, signaling inspection and remediation.
Diagnostic Decision Trees
Flowchart 1: Odor or Slow Drain Detected
- Notice odor/slow drain
- Inspect roof vent for visible blockages (leaves, nest)
- Clear debris
- Test drainage
- If unresolved, escalate to professional service
Flowchart 2: Drain Noise Detected
- Hear gurgling/drain noise
- Inspect vent pipe for damage or misconnection
- Repair/replace damaged pipe/connection
- Test for normal operation
- If noise persists, consult a professional
Flowchart 3: Winter/Icing Issues
- Cold weather event
- Inspect for frozen vent outlet/ice accumulation
- Remove ice blockage safely
- Install insulation or heat tape to prevent reoccurrence
- If hazardous or inaccessible, call a licensed service technician
Parts Replacement and Repair Guide
Common Replacement Parts
- Vent stack segments (PVC, ABS)
- Roof flashing and specialty sealants
- Air admittance valves (AAVs)
- Pipe couplings and clamps
Sourcing Quality Parts
Choose parts from local plumbing supply stores, certified septic equipment vendors, or reputable online retailers. Look for warranty-backed ASTM/NSF-rated materials.
Step-by-Step Replacement Instructions
- Put on safety equipment and set up ladder/harness for roof work
- Carefully remove damaged vent sections; use reciprocating saw/screwdriver as needed
- Clean all mating surfaces; inspect adjoining pipe ends for cracks or debris
- Install new pipe segments with approved primer/cement or mechanical couplings
- Seal roof penetration with flashing and waterproof caulk
- Ensure vertical vent terminates at the correct height as per local code
Post-Repair Testing Checklist
- Visually check for secure, watertight seals
- Test airflow (listen for clear passage/gas odors)
- Run drainage fixtures to confirm improved flow
- Retest for pressure or leaks as needed
Escalation Protocol: When to Call a Pro
Safety-Related Red Flags
- Persistent, strong indoor sewer odor
- Inaccessible/unstable roof or vent location
- Exposure to hazardous gases (use CO/gas detector readings)
- Electrical control or aerator involvement
Complexity Threshold Examples
- Major vent system damage needing full pipe reroute
- Frequent, recurring blockages despite repairs
- System-wide slow drainage, not limited to single fixture
Cost–Benefit Considerations
Weigh needed time, tools, and safety skill against the cost of hiring a licensed plumber. Extensive repairs done incorrectly can result in water damage, code violations, or hazardous exposures, leading to greater future expenses.
How to Prepare for the Service Call
- Document all observed symptoms and attempted repairs
- Take photos or make diagrams of vent system/access issues
- Secure pets and clear workspaces before technician arrival
Preventive Maintenance Schedule Integration
Preventing Blockages and Failures
Regular maintenance prevents most vent pipe issues by stopping gas buildup, removing debris before clogging occurs, and helping identify wear or leaks early (see our
Septic Maintenance Guide).
Early Detection and Monitoring Devices
Installing gas detectors or vent stack airflow sensors offers peace of mind. Early alerts to vent blockage or abnormal gas presence allow prompt, safe intervention by the homeowner or a pro.
Seasonal Maintenance Checklist
- Fall/Winter: Inspect and clear vents before the freeze; install insulation as needed
- Spring: Remove any winter debris, check for animal nests or damage
- Annual: Schedule a professional system inspection and cleaning
Frequently Asked Questions (FAQs)
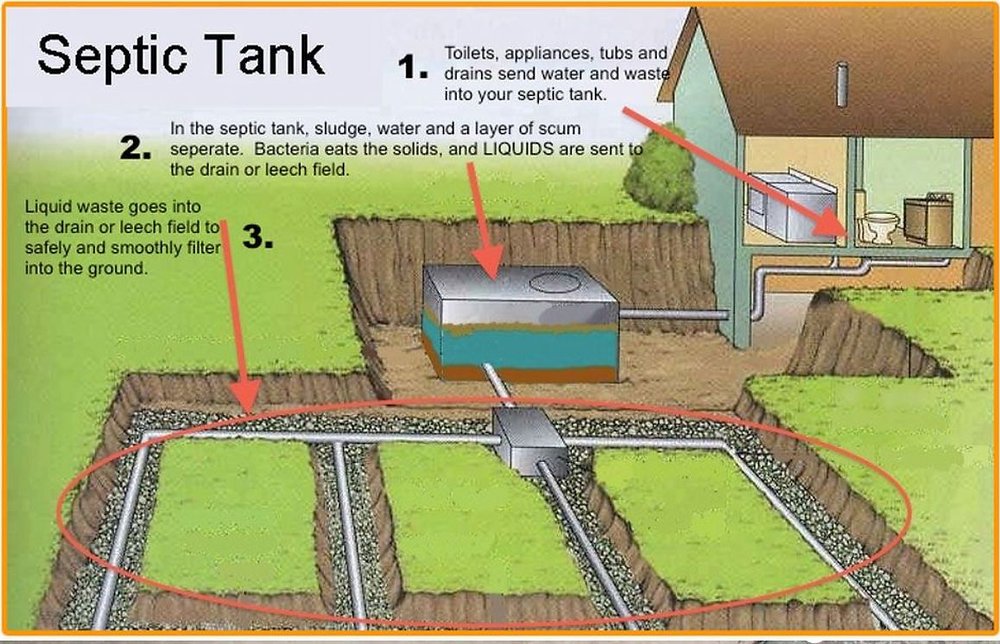
What is the purpose of a septic system vent pipe?
The vent pipe enables safe escape of sewer gases, prevents dangerous pressure buildup in plumbing, and supports proper wastewater flow by allowing air into drain lines (refer to EPA).
Why do I smell septic odors inside my house?
Indoor sewer odors are typically due to clogged or improperly functioning vent pipes, or a damaged vent stack that allows gases to infiltrate living space.
Where is the septic system vent pipe located?
The primary vent pipe usually exits through the roof, directly connected to the waste plumbing stack. Additional “yard vents” near the tank or field may help release trapped gases underground.
Can frozen vent pipes cause drainage or odor issues?
Yes. A frozen or iced-over vent blocks airflow, causing slow drains, gurgling noises, and sewer odors indoors. Clearing ice safely and insulating exposed vents are recommended.
How can I tell if my vent pipe is clogged?
Key signs: persistent sewer smell indoors, slow draining fixtures, gurgling from drains/toilets, or visible debris blocking the top of the roof stack. Use a flashlight or inspection camera for confirmation.
What are the basic maintenance steps for a septic vent pipe?
Seasonally remove debris (leaves, nests), inspect for cracks/damage, and ensure vents are unobstructed after storms or snow. Check out our
Plumbing Vent Stack Cleaning Procedures.
Are septic vent pipe failures dangerous?
Yes. Sewer gases are both toxic and flammable. Poor or absent venting increases the risk of gas buildup, as warned by the CDC. Wear protective gear and work with the area well ventilated.
When should I call a professional plumber?
Call a licensed plumber or septic pro if odors persist after vent clearance, repairs require difficult roof access or expertise, or if electrical/safety risks are present.
Can I use chemicals to unclog a vent pipe?
No, chemical drain cleaners are not recommended for vent pipes. Use mechanical cleaning methods (auger, snake) and never introduce flammable or harsh chemicals into the venting system.
What is an air admittance valve (AAV) and can it replace a roof vent?
An AAV allows air into the plumbing system to equalize pressure but cannot fully substitute for an exterior (roof) vent, especially in septic systems. Use with caution and per building code.
How high should a septic vent pipe extend above the roof?
Building codes (refer to local code or PDI standards) require most vent stacks to rise at least 6 inches above the roofline, and often more in snow-prone climates.
Can animals block my vent pipe?
Yes. Birds, rodents, or insects can build nests inside vent stacks, clogging them and causing drainage or odor issues. Install vent caps or screens designed for plumbing use to reduce risk.
Is odor always a sign of a vent pipe problem?
Not always—bad odors may also result from dry traps or septic tank issues, but vent pipe blockage is a leading cause and should always be checked.
Will insurance cover septic vent pipe repairs?
Coverage depends on your policy and whether damage was sudden/accidental or caused by neglect. Check with your insurer for clarification.
Can a plumber inspect my septic vent pipe with a camera?
Yes. Many professionals use specialized inspection cameras to detect internal blockages, cracks, or leaks, providing visual evidence and a precise repair plan.
What resources should I consult for septic maintenance and repair codes?
Refer to municipal plumbing code, the EPA Septic System Owner’s Guide, and nationally recognized plumbing venting standards from the Plumbing & Drainage Institute.
Further Reading & Resources
- EPA Septic System Owner’s Guide
- CDC Sewage and Wastewater Worker Safety
- Plumbing & Drainage Institute Vent Standards
- Homeowner’s Guide to Septic System Parts
- Seasonal Septic System Inspection Checklist
- Safe Roof Access for Plumbing Repairs
Bottom Line: Promptly addressing septic system vent pipe problems ensures a safe, odor-free home—and regular inspection or professional guidance protects your property and well-being. Need help now? Contact a licensed local septic specialist for an expert assessment and repair.
Leave a Reply