Are you dealing with a wet or high water table site and worried about installing a reliable septic system? Discover proven engineered solutions that keep your home safe, your yard dry, and the environment protected—even when conventional systems fail.
Quick Answer: The best septic systems for wet or high water table areas are mound systems, aerobic treatment units (ATUs), and engineered sand filter or drip dispersal systems. These solutions elevate and effectively treat effluent, preventing contamination and system failure. Conventional systems rarely work reliably in saturated sites.
- Wet soil or high water tables often cause traditional septic systems to fail.
- Mound, ATU, sand filter, or drip dispersal systems are engineered for these conditions.
- Site evaluation and compliance with local health codes are critical.
- Professional installation is strongly recommended for optimal safety and performance.
- Maintenance needs are higher due to moisture and soil instability.
Installing a septic system on wet or high water table soil presents unique challenges that conventional systems cannot address. This guide will teach you how to select and implement a septic system for wet areas—such as mound systems and other engineered solutions—by walking you through essential evaluation, installation, and maintenance steps. By following this guide, you’ll avoid system failures, environmental contamination, and costly repairs, and achieve a septic system that safely treats and disperses effluent despite challenging site conditions.
Prerequisites and Skill Level: Intermediate technical knowledge is helpful, especially in soil science or civil engineering. Homeowners can undertake some tasks with professional support for specialized steps like soil testing/design.
Time and Cost: Engineered septic systems for wet areas are 30–50% costlier than standard systems (source: EPA), and completion may take several days to weeks depending on site prep and weather.
Preparation and Safety
Tools and Materials Checklist
- Soil test kit or professional soil report
- Excavator or digging tools
- Perforated pipe and gravel for drain field
- Appropriate septic tank (size/type)
- Sand, gravel, topsoil for mound construction
- PVC pipes and fittings
- Level and tape measure
- Protective gear: gloves, boots, eye protection
- Effluent pump (if using ATU)
- Shovel, rake, wheelbarrow
Safety Precautions and Protective Gear
- Wear waterproof boots with non-slip soles to prevent slips.
- Use gloves to avoid contact with effluent and soil pathogens.
- Ensure good ventilation when working with tanks (danger: toxic gases).
- Never work alone during excavation—always have a spotter.
- Comply with local sewage regulations and safe waste disposal rules (EPA Septic Guidelines).
Workspace Setup and Preparation
- Clear installation area of vegetation and debris, minimizing disturbance to natural water flow.
- Mark tank, mound, and field boundaries per engineer’s plan.
- Seasonally assess water table to determine minimum system elevation or mound height.
- Create stable, non-disruptive machinery paths to protect surrounding soil.
Step-by-Step Implementation Guide
- Conduct Comprehensive Site and Soil Evaluation
- Test soil texture, percolation rate, and measure seasonal high water table.
- Consult a certified soil scientist (Soil Percolation Test Guide).
- Choose the right system: mound, ATU, sand filter, or drip dispersal based on data.
- Design the Engineered Septic System
- Use soil/water data to plan system layout.
- For high water tables, design elevated mound systems (Mound System Design Guide).
- Other options: ATU, drip dispersal, sand filters.
- Ensure local code compliance; submit plans to health department.
- Prepare Site & Build the Mound or Sand Filter
- Excavate to install tank and mound system as per specifications.
- Layer sand, gravel, and topsoil in mound; properly compact for drainage and stability.
- Shape mound for gentle slope and runoff diversion.
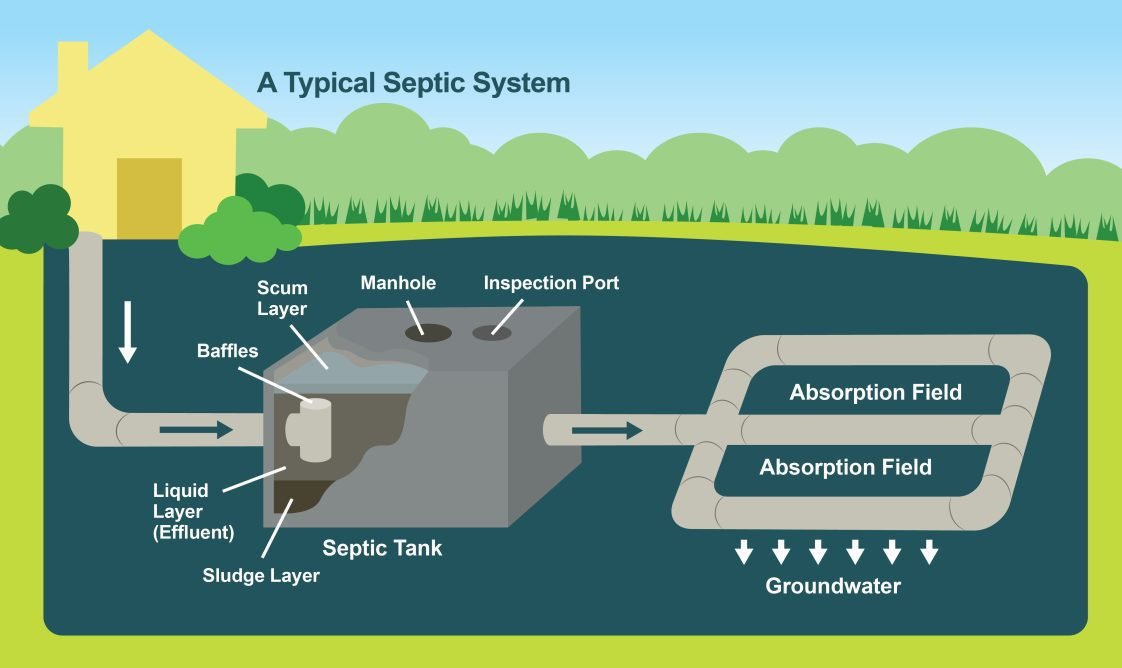
- Install Tank, Piping, and Dispersal Components
- Set septic tank above the high water table if possible.
- Connect pipes with watertight seals and correct slope.
- Install distribution boxes and lines inside mound/drain field for even dispersal.
- Place ATU if specified, and connect effluent pumps if used (About ATUs).
- Final System Testing & Site Restoration
- Conduct water-tightness test for tanks and pipes.
- Backfill carefully, grade surface to direct water away.
- Establish erosion-resistant vegetation on mound.
Quality Control and Testing
How to Verify Success
- No surface pooling, strong odors, or sewage backup post-installation.
- Stable mound (no depressions, no runoff nearby).
Testing Procedures and Key Metrics
- Conduct percolation tests to ensure proper soil infiltration.
- If using ATUs, periodically sample effluent for biological oxygen demand (BOD) and total suspended solids (TSS), as recommended by NOWRA and WEF.
- Check for groundwater contamination with regular monitoring if mandated by code.
Troubleshooting Common Issues
- Odor or slow drainage: Inspect for pipe clogs or leaks.
- Saturation/wet spots: Increase mound height, check compaction, add sand layers as needed.
- Structural damage: Repair tank/pipe cracks; ensure adequate compaction/restoration.
- Surface pooling: Re-grade and improve runoff management (Learn More).
Maintenance and Long-Term Care
Daily/Weekly
- Keep vehicles/heavy equipment away from mound and drain field.
- Divert rainwater and surface runoff from septic area.
- Avoid flushing large solids or non-biodegradable materials (Septic Maintenance Tips).
Monthly/Quarterly
- Check tank sludge level; arrange pumping every 3–5 years or as needed.
- Clean effluent filters and diffusers.
- Inspect distribution box and all piping for leaks or sediment buildup.
Watch for These Signs of Wear/Failure
- Persistent wet or soggy mound surfaces.
- Cracks in tank or pipes; system backup.
- Poor effluent test results; failed BOD/TSS benchmarks.
- Sinkholes or settling in drain field/mound.
Pro Tips and Advanced Techniques
| Technique | Professional Tip or Benefit |
|---|---|
| Effluent filters | Reduce solids entering the field and extend system life |
| Pressure distribution | Ensures even effluent distribution, essential for wet or variable soils |
| ATU Pre-treatment | Increases decomposition rate and improves water quality in outflow |
| Moisture meters | Monitor saturation and catch problems early |
| Customized mound size/shape | Adapt to local groundwater or soil constraints; use multiple small mounds if needed |
| Drip dispersal/sand bed | Useful where soil constraints are extreme |
Frequently Asked Questions
What septic system types work best for wet areas?
Engineered systems—such as mound septic systems, aerobic treatment units (ATUs), sand filter, or drip dispersal systems—work best for wet or high water table areas. They elevate or pre-treat effluent, preventing soil saturation that can cause conventional systems to fail.
How deep should a mound septic system be in high water table conditions?
Mound height varies by code, but typically includes 2–3 feet of sand and gravel above natural soil, keeping the dispersal field safely above the seasonal high water table.
Can I install a conventional septic system on wet soil if I add sand or gravel?
No. Adding sand or gravel alone cannot overcome the issues of a high water table or saturated soil. Only engineered systems like mounds or ATUs are recommended for consistently wet areas.
What maintenance is unique to septic systems in wet areas?
Wet area systems require more frequent checks for mound integrity, pump function (if present), and rigorous management of surface water. Promptly address pooling or odors to avoid major failures.
How do aerobic treatment units (ATUs) improve septic performance in wet soil?
ATUs add oxygen to assist biological breakdown of waste, reducing organic matter and improving septic system performance in saturated soil. They’re often combined with mound or drip systems in challenging sites.
Are mound septic systems suitable for all wet or boggy properties?
Mound systems suit many wet soils but may be limited by extremely shallow groundwater or space restrictions. Each property must be professionally evaluated to select the best system.
How can I tell if my septic system for wet areas is failing?
Look for persistent wet spots, strong odors, slow household drainage, or sewage backups. Professional testing of effluent quality and regular inspections are essential for early detection.
What does an engineered septic system for wet areas cost?
Expect to spend 30–50% more than standard systems due to design, labor, and extra materials. However, engineered systems dramatically reduce long-term repair or replacement expenses otherwise caused by premature failure (source: EPA).
Quick Recap
- Wet soil or high water tables demand specialized, engineered septic solutions—not standard systems.
- Mound systems, ATUs, sand filters, and drip dispersal are proven, code-compliant choices.
- Professional site evaluation, code-compliant design, and regular maintenance are essential for safety and longevity.
Key Takeaways
Choosing and installing the right septic system for a wet or high water table site is critical for property value, health, and environmental stewardship. Engineered systems—especially mound and ATU layouts—offer durable, code-compliant, and eco-friendly answers to these challenges. Professional guidance, diligent planning, and ongoing care are the foundation for lasting success. Trust proven methods and stay informed with leading resources, such as the EPA Septic Systems Guide and NOWRA.
Further Reading and Resources
- How to Conduct a Soil Percolation Test for Your Septic System
- Aerobic Treatment Systems: What You Need to Know
- Septic Tank Maintenance Best Practices
- Designing a Mound Septic System: Technical Considerations
- Managing High Water Table Challenges on Your Property
- U.S. Environmental Protection Agency (EPA) Septic Systems Guide
- National Onsite Wastewater Recycling Association (NOWRA)
- Water Environment Federation (WEF) Onsite Treatment Resources
Ready to install a reliable septic system for wet ground? Consult local professionals and reference trusted engineering resources to protect your property for decades.
Leave a Reply