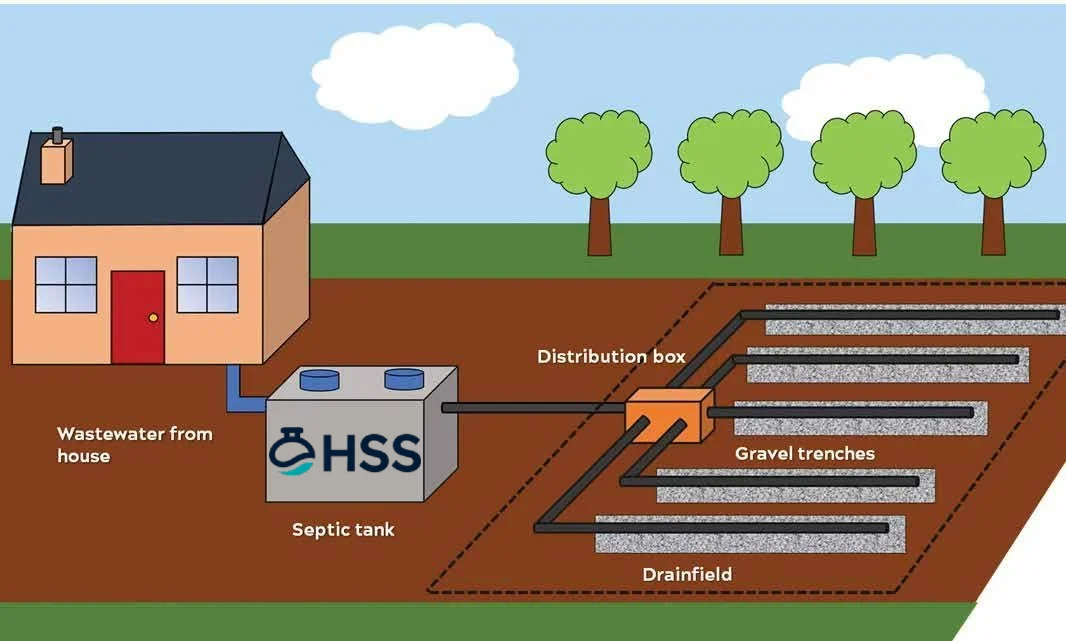
To properly install a septic system, start by securing permits and conducting a thorough site evaluation per your local health department’s requirements. Use proper safety gear and equipment to excavate, install the tank and drain field, assemble drainage materials, and complete final grading. Testing and inspection are required for compliance before backfilling and using the system. Most installations take 2–4 weeks.
- Permits, soil tests, and approvals are critical upfront steps
- Strict safety and preparation standards protect you and your property
- Each installation phase (excavation, tank, drain field, grading) must meet local codes
- Proper backfilling and grading ensure longevity and drainage performance
- Professional installation is recommended for compliance and warranty reasons
Table of Contents
Are you planning to build a new home or replace an outdated septic system? Understanding the entire septic system installation process—from permits to achieving the final grade—is crucial for long-term reliability, compliance, and safeguarding your health and property. This comprehensive guide delivers proven steps used by industry professionals, helping you avoid inspection setbacks, protect your investment, and ensure safety. Whether you’re overseeing a contractor or want to understand what’s involved, these instructions will guide you through each critical phase of a code-compliant installation.
Prepare Your Site and Ensure Safety
Gather Tools and Materials
- Excavator or backhoe for trenching and tank setting
- Shovels, rakes, and hand tools
- Septic tank (approved type/size) and drain field materials (pipes, chambers, fittings)
- Gravel or drainage aggregate (per local standards)
- Measuring tape and builder’s level (laser levels recommended)
- Pipe primer and PVC cement
- Protective barriers, utility flags, marking paint
- Personal protective equipment: gloves, safety glasses, hard hat, steel-toe boots
Apply Mandatory Safety Precautions
Warning: Never excavate before contacting your local utility marking service—striking underground lines is dangerous and often illegal. Per EPA recommendations, always wear gloves, sturdy boots, safety goggles, and a hard hat during installation work. Use extreme caution when lifting or moving heavy tanks, and establish visible barriers around all trenches to prevent accidents.
Set Up the Workspace
Clear the installation zone of brush, rocks, and debris. Place barriers and warning signs around the perimeter to restrict access. Grade the work area for safe machinery movement and water runoff. Ensure the path for trucks and heavy equipment does not endanger structures, driveways, or underground utilities.
Follow the Step-by-Step Septic System Installation Process
- Obtain All Required Permits and Site Evaluations Submit an application to your county or state environmental health department. Your permit package must include engineered plans and soil percolation (perc) test results. Approval is required before any installation per EPA and local health guidelines (NOWRA standards).
- Excavate Tank Pit and Drain Field Trenches Use an excavator or backhoe to dig according to your engineering plans. Verify trench depth and pipe slope continuously with a builder’s level or laser. Protect tree root zones, landscaping, and building foundations during excavation.
- Install Septic Tank and Connect Inlet/Outlet Pipes Set the tank on a compacted gravel base—level and stable. Connect all pipes with code-compliant couplings, and seal every joint with appropriate primer and solvent for leak prevention.
- Lay Out and Backfill Drain Field with Gravel and Fabric Install perforated pipe or chamber materials to create the drain field network. Cover with specified gravel, then a layer of geotextile fabric to minimize soil infiltration into the drain system.
- Backfill, Compact Soil, and Perform Final Grading Backfill trenches in layers, compressing gently to secure pipes without crushing. The final site grading must direct groundwater away from the septic tank and drain field to prevent saturation or erosion.
Verify Installation Quality and Test the System
Best Practices for Quality Assurance
- All components installed must match the engineered plans and permit
- Pipe slopes typically require a minimum drop of 1/8 to 1/4 inch per foot (per state/local code)
- All joints and tank inlets/outlets must be watertight
- No visible soil movement or damage after backfilling
Testing Procedures
- Perform a water-tightness (leak) test on the tank and main lines before backfilling—add water and observe for drops indicating leaks
- Test pipe flow by slowly running water from the house to the distribution network; check for uniform drainage in all drain field lines
- Verify system meets health department and permit final inspection checklists
Troubleshooting Tips
- Pooling surface water—likely poor grading or clogged pipes; confirm slopes and debris removal
- Odors—may indicate leaks, improper ventilation, or cracked components
- Tank or pipe leaks—usually require professional repair or full component replacement
Maintain and Monitor for Long-Term Performance
Daily & Weekly Septic Best Practices
- Do not flush wipes, grease, or chemicals—these cause clogs and damage
- Monitor warning devices (alarms, floats) for abnormal activity
- Keep a maintenance log of usage, pumping, and professional inspections
Monthly and Quarterly Tasks
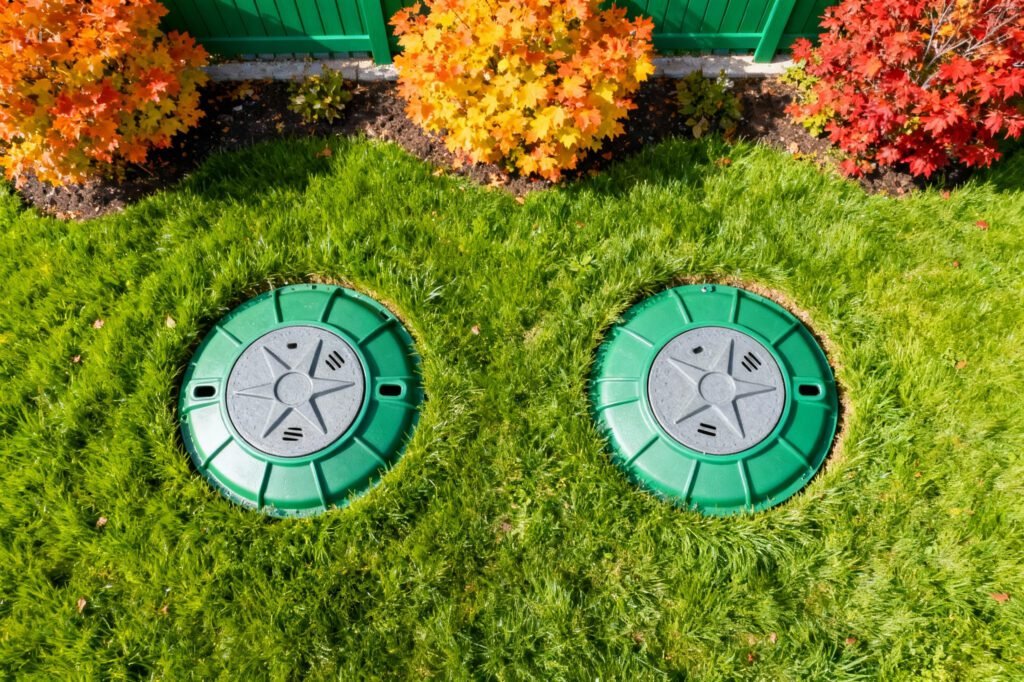
- Visually inspect risers, cleanouts, and tank access ports for cracks or blockages
- Maintain clear access to tank lids and do not plant bushes or trees over any septic component
- Arrange professional tank pumping every 3–5 years depending on use
Know Signs of System Distress or Failure
- Frequent backups, slow drains, or foul odors signal urgent issues
- Wet, soft, or spongy areas above drain field may mean failure or waterlogging
- Tank cracks, severe corrosion, or displaced lids require immediate replacement
Advanced Methods and Equipment
Pro Installation Tips
- Plan installation during dry weather to improve soil condition and site access
- Use laser leveling tools for precise pipe pitch, reducing risk of standing wastewater
- Pre-mark all utilities and property lines to prevent costly mishaps and delays
Recommended Tools & Upgrades
- Tank risers for easy future access and maintenance
- Rugged gas detector for working around or monitoring the tank during maintenance
- High-strength PVC primer and glue for durable pipe connections
Customize Your System for Unique Needs
- Consider aerated or advanced treatment systems for poor soils or compact sites
- Modular drain field designs offer easier expansion if property use changes
Frequently Asked Questions
What is the typical timeline for septic system installation?
A standard septic system installation—from permit to final grade—takes about 2 to 4 weeks. Delays may occur due to soil condition, weather, or permitting backlogs.
How much does septic system installation cost?
Costs typically range from $5,000 to $15,000 or more. Factors include tank and drain field size, soil type, site accessibility, and local regulatory requirements.
Do I need a permit to install a septic system?
Yes, per EPA guidelines and state/local laws, a septic permit is mandatory. Most local health departments require site evaluations and detailed plans before approving installation.
How do I know if my soil is suitable for a septic system?
A certified soil percolation (“perc”) test is required. This measures the soil’s ability to absorb water. Unsuitable results may call for specialized systems or design modifications.
Can I perform septic system installation myself?
Due to code, technical, and safety standards, hiring a licensed contractor is strongly recommended. Many jurisdictions prohibit homeowner installations or require professional oversight.
How often should I have my septic tank pumped?
Most tanks need pumping every 3–5 years depending on usage and tank capacity. Check with your installer or health department for the best schedule for your system.
What maintenance keeps a septic system running well?
Avoid flushing harmful materials, conserve water, monitor alarms, and check access ports regularly. Arrange for professional pumping and inspections as recommended.
What should I do if my septic system fails?
Immediately contact a licensed septic professional. Do not attempt DIY repairs, as they may cause contamination or structural damage. Severe failures may require tank or drain field replacement.
Comparison Table: Key Installation Steps and Requirements
| Step | Key Actions | Compliance/Testing |
|---|---|---|
| Site Evaluation & Permit | Soil test, submit plans, obtain approval | Health dept. permit; perc test required |
| Excavation | Dig tank hole, drain field trenches | Check for utilities; verify depth/slope |
| Tank/Pipe Installation | Set tank, connect pipes securely | Seals and slopes per code; leak test |
| Drain Field Placement | Install pipes/chambers, cover with gravel and fabric | Uniform distribution; code specs |
| Backfill & Grading | Compact soil in layers, grade surface | Final inspection; positive drainage |
Quick Recap: Septic System Installation Process
- Apply for permits and perform required site and soil tests
- Clear, grade, and prepare the installation area with proper safety barriers
- Carefully excavate and install tank and drain field according to code
- Test every component for watertightness and proper operation
- Backfill and final grade the site; protect all surfaces from runoff
- Arrange final inspection with your local health/environmental department
- Plan regular maintenance and inspections for long-term, trouble-free performance
Key Takeaways
A properly installed septic system safeguards your investment, health, and local environment. By following every step—permits, safe and accurate installation, inspections, and regular care—you secure years of dependable wastewater treatment. While professional installation is recommended for code and warranty compliance, understanding the process empowers you as a homeowner. Always consult local building and health departments and reference EPA and NOWRA guidelines for current standards.
Helpful Resources
- How Much Does Septic Tank Installation Cost?
- Guide to Maintaining Your Septic System
- Understanding Septic System Permits and Regulations
Credible Resources
- U.S. Environmental Protection Agency (EPA): Septic Systems
- National Onsite Wastewater Recycling Association (NOWRA)
- Your State or County Health Department Website (search for “septic permit” requirements)
Ready to safeguard your new build or replacement septic system? Contact a licensed septic professional for a site evaluation or schedule your permit consultation today!
Leave a Reply